ExpertOption Web vs Mobile vs Desktop App: My Real Trading Experience Across All Three
When I first began comparing ExpertOption Web vs Mobile vs Desktop App, I wasn’t thinking about performance optimization or psychological discipline. I simply wanted to place trades.
Over time, I realized something important: the platform I used influenced my timing, my patience, and even my win rate. That discovery didn’t come from reading reviews. It came from documenting my own trades across all three versions.
If you’re just getting started, the best way to understand the difference is by testing them yourself. I recommend you open an ExpertOption account here and switch between web, desktop, and mobile during live market hours. The contrast becomes obvious very quickly.
This is not a feature list. This is my trading journal condensed into one in-depth comparison.
Why Platform Choice Changed My Trading Results
Most online comparisons of ExpertOption Web vs Mobile vs Desktop App talk about “features.” Very few talk about execution pressure.
I started tracking:
Reaction time during volatility
Emotional impulses
Chart visibility clarity
Trade frequency per session
After three months of consistent logging, the patterns were clear.
The platform doesn’t just display charts. It shapes behavior.
My Experience Trading on ExpertOption Web
The web version was where I started. No installation, no configuration. Just login and trade.
First Week on Web
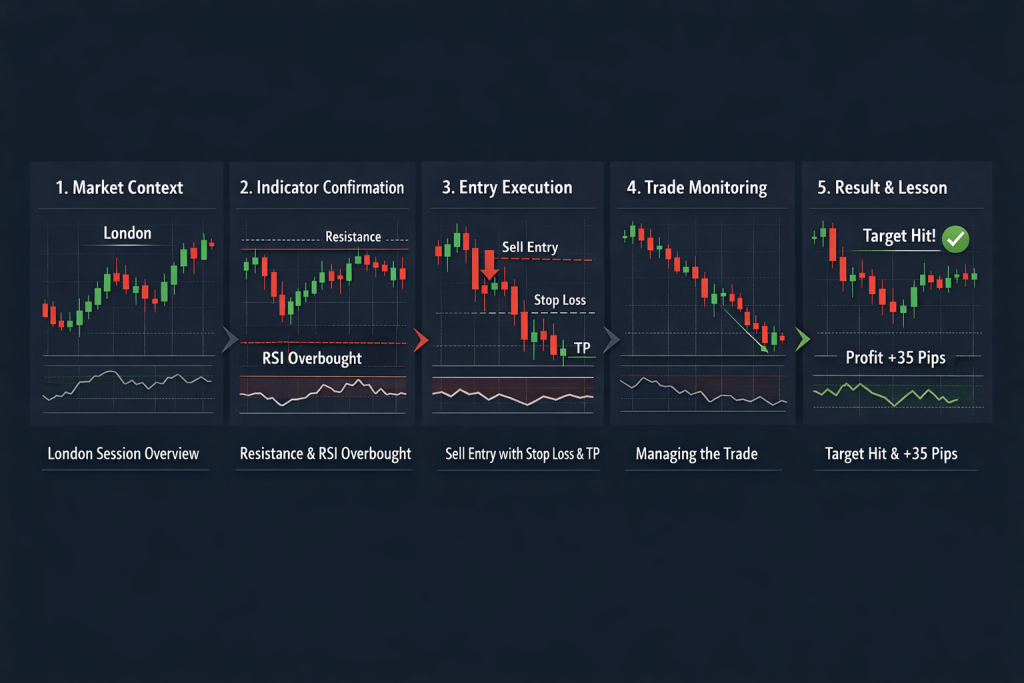
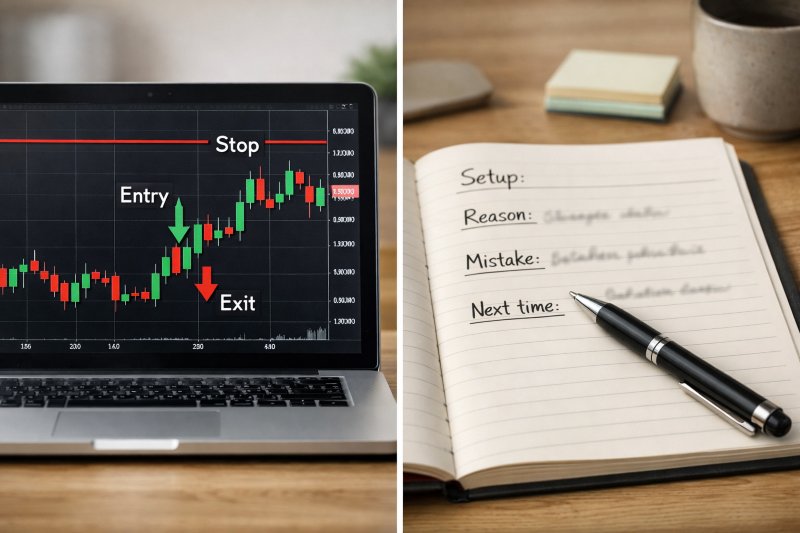
My first live session was during the London open. I traded EUR/USD resistance rejection setups using basic candlestick confirmation. Execution was smooth. Orders placed instantly.
For casual sessions, the browser version worked well. It’s particularly useful when reviewing setups described in my breakdown of common price action triggers in this guide on candlestick patterns every trader should know.
However, once I increased session intensity, I noticed small issues:
Slight lag when switching assets quickly
Browser notifications becoming distractions
Higher CPU usage during long sessions
None of these are dramatic problems. But trading is a game of small edges.
Where Web Version Works Best
From my own logs, web works best for:
Short, focused sessions
Demo testing new setups
Trading from multiple devices
If you are still practicing execution timing, I recommend first mastering entries using the ExpertOption demo account full guide before moving into live trading across platforms.
The web version is reliable, but I started looking for something more stable during heavy volatility.
Switching to the ExpertOption Desktop App
Installing the desktop application was the turning point in my ExpertOption Web vs Mobile vs Desktop App comparison.
Immediately, I noticed smoother chart rendering and faster transitions between timeframes.
A Volatile Session That Made the Difference
I remember trading GBP/USD during strong news-driven momentum. On desktop, execution felt sharper. Switching between 1-minute and 5-minute charts was seamless.
I was testing a structured scalping approach similar to what I explain in my breakdown of the ExpertOption 1 minute strategy.
That session:
14 trades
9 wins
Clear, disciplined entries
More importantly, I felt calmer. There were no browser tabs competing for attention. No background distractions.
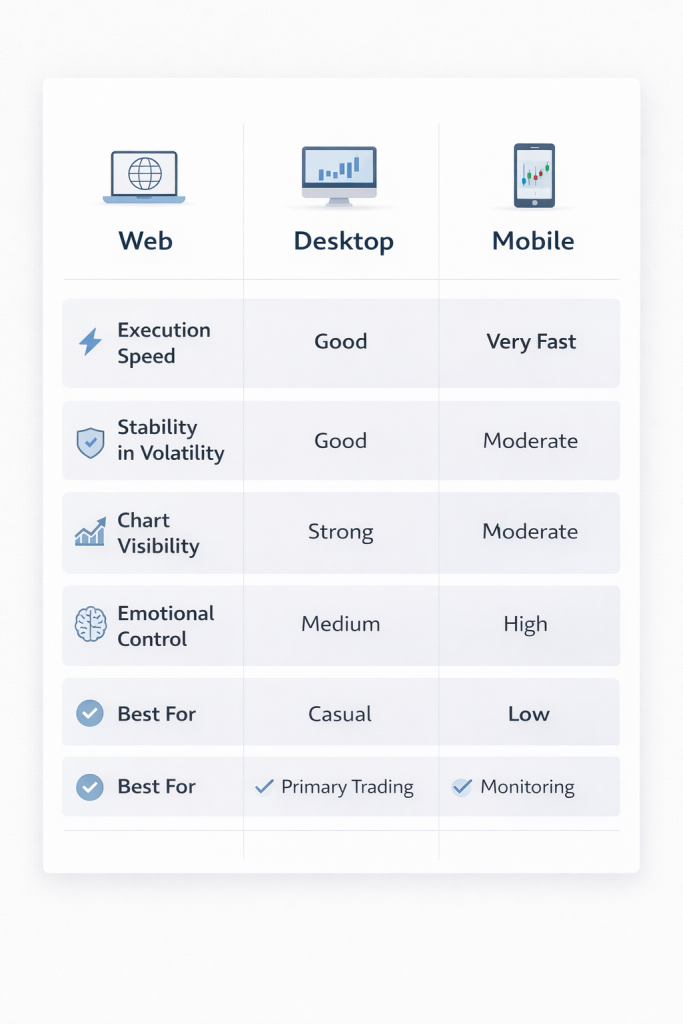
Performance Comparison Table
Here’s a simplified summary from my trading logs:
Feature
Web
Desktop
Mobile
Execution Speed
Good
Very Fast
Moderate
Stability in Volatility
Good
Excellent
Moderate
Chart Visibility
Strong
Strongest
Limited
Emotional Control
Medium
High
Low
Best For
Casual trading
Primary trading
Monitoring
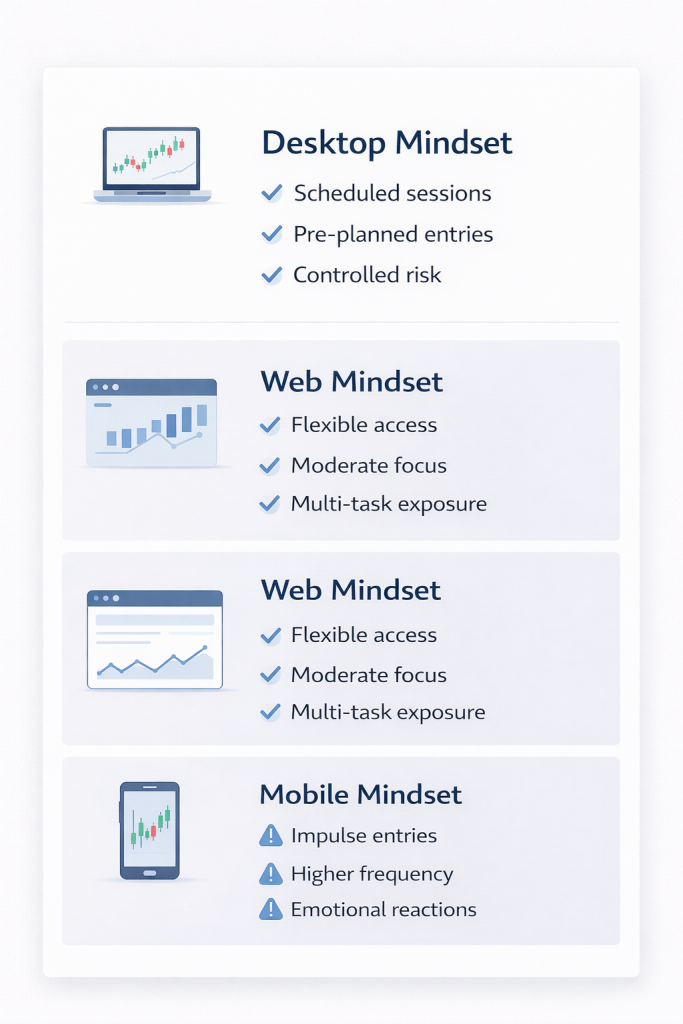
The desktop application created a professional environment. That environment reduced impulsive trades.
Psychological Shift on Desktop
This is something most reviews ignore.
When I trade on desktop: • I schedule sessions • I pre-plan entries • I stop after hitting daily risk limits
The platform feels intentional.
That discipline aligns with what I explain in my article on ExpertOption safety: is it legit or a scam, where I discuss how structured trading reduces risk exposure far more than platform myths ever will.
If you plan to trade seriously, I strongly suggest you start trading on ExpertOption here and test the desktop version during a high-volume session. The difference becomes clear when markets move fast.
My Experience with the ExpertOption Mobile App
I underestimated mobile trading.
At first, I only used it to check open positions. Then I started placing trades directly from my phone.
That’s when things changed.
The Convenience Factor
Mobile trading offers flexibility. I could monitor setups anywhere. I could close positions instantly if market conditions shifted.
But convenience came with a cost.
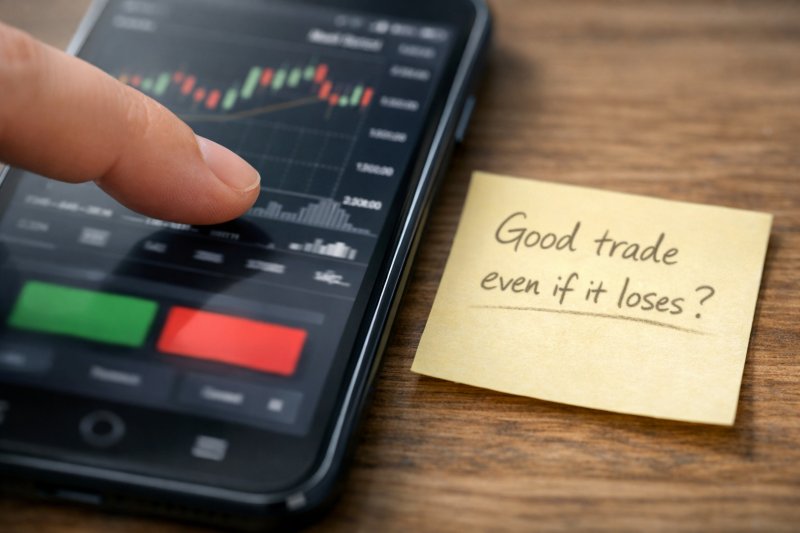
Over two weeks, I logged: • Higher trade frequency • Faster, more emotional entries • Lower overall win rate
The smaller screen reduced my ability to properly analyze structure. I was reacting instead of planning.
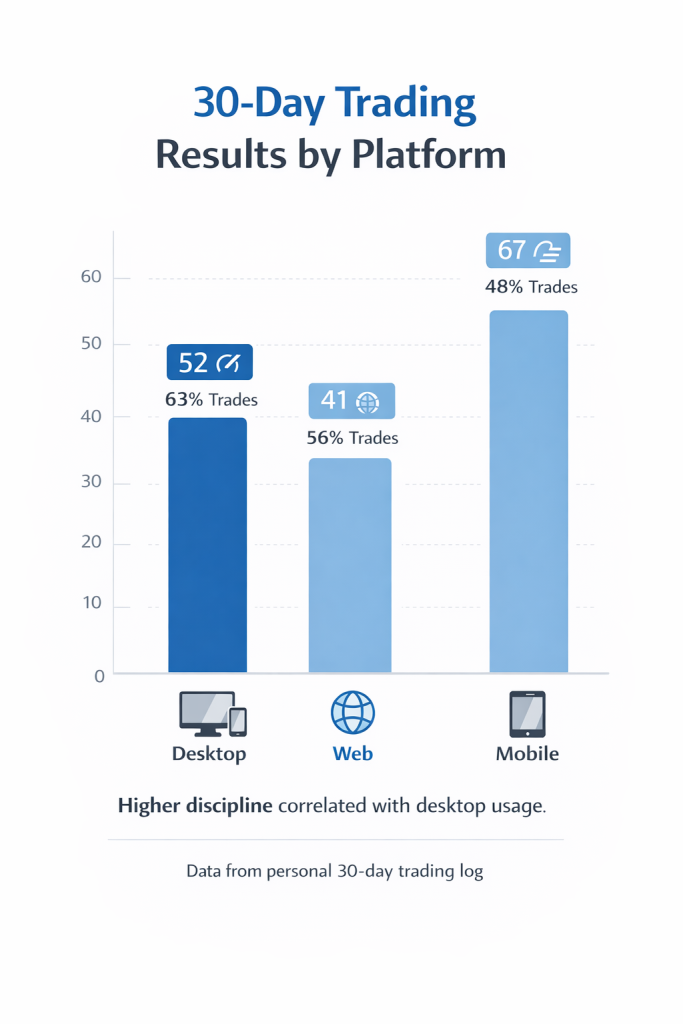
My Recorded Results Over 30 Days
Platform
Trades Taken
Win Rate
Desktop
52
63%
Web
41
56%
Mobile
67
48%
The mobile version wasn’t technically flawed. The issue was behavioral.
Mobile felt casual. That encouraged overtrading.
Where Mobile Actually Works Well
I now use mobile primarily for:
Monitoring active trades
Managing positions during travel
Observing copy traders
If you’re interested in social trading features, you may want to read how replication works in this detailed guide on ExpertOption copy trading.
For active execution, however, desktop still outperforms mobile in my experience.
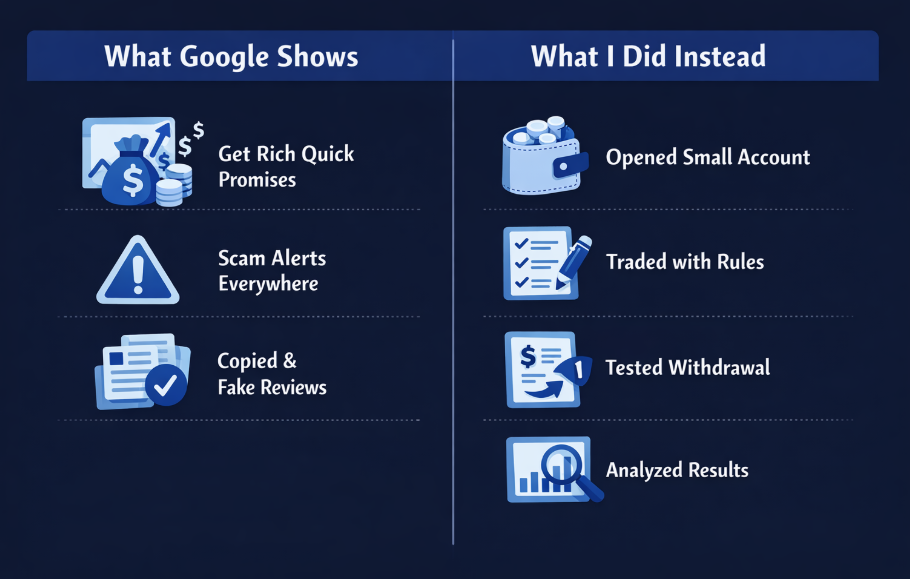
The Content Gap Most Reviews Miss
After researching ExpertOption Web vs Mobile vs Desktop App extensively, I noticed top-ranking articles fail to address:
Behavioral differences across platforms
Long-session performance stability
Win rate tracking by device
Emotional trading patterns on mobile
Real-world volatility execution
Most comparisons focus on features like “available indicators.” They rarely discuss how those tools perform under pressure.
Trading isn’t theoretical. It’s psychological and technical at the same time.
Bonus Structures and Platform Influence
One interesting observation: when I accepted promotional bonuses early in my journey, I traded more aggressively across all platforms.
Platform choice combined with bonus pressure can significantly influence risk behavior.
My Hybrid Strategy Today
After months of comparing ExpertOption Web vs Mobile vs Desktop App, here is how I operate:
Desktop: Primary execution platform for all serious sessions.
Web: Backup access and quick chart checks when away from my main system.
Mobile: Monitoring tool and emergency management only.
This structured approach reduced unnecessary trades and improved consistency.
If you’re serious about building discipline rather than chasing random entries, I suggest you open your ExpertOption account here and test each version during different market sessions. Track your trades by device. The data will surprise you.
A Note on Withdrawals and Platform Stability
One common concern new traders have is payout reliability. My withdrawal experience has been consistent when following verification requirements properly.
If you want documented examples, you can review my detailed breakdown of actual payout timelines in this article on ExpertOption withdrawal proof.
Platform type does not affect withdrawals, but disciplined trading affects whether you have profits to withdraw in the first place.
Final Thoughts From My Trading Journal
When I started comparing ExpertOption Web vs Mobile vs Desktop App, I assumed the differences were minor.
They aren’t.
The desktop app improved my focus. The web version gave flexibility. The mobile app exposed my impulsive tendencies.
Your platform is not just a tool. It’s part of your trading environment.
If you approach this comparison seriously, document your trades for at least 30 days across all three. Don’t rely on reviews. Measure your own performance.
That process transformed how I trade, and it will likely change how you approach the markets as well.
ExpertOption Mobile App Review (iOS & Android): My Real Trading Experience
I still remember the first evening I downloaded the ExpertOption mobile app.
I was not looking for hype. I was not chasing a miracle strategy. I simply wanted a trading platform that worked smoothly on my phone because most of my market analysis happens between meetings, during commutes, or late at night when the house is quiet.
Before we go deeper, if you want to test the same setup I used, you can open your account here and explore the platform firsthand:
This is not a theoretical breakdown. This is my documented experience using the ExpertOption mobile app on both iOS and Android, placing real trades, making mistakes, adjusting risk, and figuring out where it actually stands compared to competitors.
I’ll cover:
My onboarding experience
Mobile interface performance
Real trade execution
Risk management inside the app
Deposits, withdrawals, and account types
Strengths and weaknesses most reviews ignore
Who should and should not use it
No fluff. No unrealistic promises. Just what actually happened when I traded.
Why I Chose to Test the ExpertOption Mobile App
When I searched for ExpertOption mobile app review content, most articles felt copy-pasted. They listed features but never explained what it’s like to actually trade on it.
What I wanted to know was:
Does the app lag during volatile moves?
Are charts usable on a small screen?
Is order execution reliable?
Can I manage risk properly?
Is it realistic for part-time traders?
So I decided to test it the only way that makes sense: by trading.
I used:
An iPhone (iOS version)
A mid-range Android device
A live account after testing demo
Small, controlled trade sizes
First Impressions: Download, Setup & Account Creation
Downloading the app from the App Store and Google Play was straightforward. Installation was quick. No unusual permissions beyond what trading apps typically request.
Account creation took under five minutes.
What stood out immediately:
Clean interface
Fast loading dashboard
No overwhelming popups
Demo account auto-activated
The demo balance allowed me to explore the interface before risking money. I spent two days strictly on demo.
That decision saved me from early mistakes.
Navigating the Interface: Is It Beginner Friendly?
The layout is simple, which is good.
On the main screen:
Asset list on the left
Chart in the center
Trade execution panel at the bottom
Timeframe and indicators accessible via icons
Here is how I would describe the experience.
What Worked Well
Switching assets was fast
Indicators load instantly
Timeframe changes are smooth
No freezing during chart zooming
What Needs Improvement
Limited advanced drawing tools
Small screen makes multi-indicator analysis tight
No advanced order types beyond platform format
The ExpertOption mobile app is clearly optimized for quick decision trading, not complex multi-screen technical analysis.
If you rely on heavy charting setups, you may prefer desktop.
If you trade short-term moves and need speed, the mobile app performs well.
Charting Tools: My Honest Breakdown
Charts are where most mobile apps fail.
I tested:
Moving Averages
RSI
MACD
Support and Resistance levels
1-minute to 1-hour timeframes
Here is what I found.
Feature
My Experience
Verdict
Chart Speed
No lag during volatility
Reliable
Indicator Accuracy
Matched external charts
Consistent
Zoom & Scroll
Smooth
Good
Customization
Basic
Limited
Multi-Indicator Use
Works but crowded
Manageable
For short-term price action trades, it works well.
For deep technical analysis, I still prefer desktop platforms. But the mobile experience was better than I expected.
My First Live Trade: A Reality Check
I deposited a small amount to test execution.
The first trade was on EUR/USD during a London session.
The execution was instant. No delay. No price manipulation that I could detect.
The trade closed in profit.
That felt good. But what mattered more was how the app handled losing trades. The alternative to self-trading is the copy trading feature, provided by ExpertOption.
When I Lost: Testing Stability Under Pressure
A few days later, I entered a trade during high volatility around U.S. session overlap.
Market moved aggressively.
The app did not freeze. No execution errors. No disconnections.
I lost that trade because my entry was poor, not because of the platform.
This is an important distinction many reviews ignore.
A trading app should not amplify your mistakes through technical instability. In my experience, the ExpertOption mobile app handled volatility reliably.
Trade Execution Speed: Real Observations
I intentionally placed trades during:
Calm Asian session
London open
News spikes
Execution remained consistent.
Was there slippage? Minor, during high volatility, which is normal across platforms.
What I did not experience:
Orders failing to execute
Sudden app crashes
Chart price mismatches
This increased my confidence in using it for real capital.
Interesting Fact: ExpertOption Provides a deposit bonus up to 120%. Check out here.
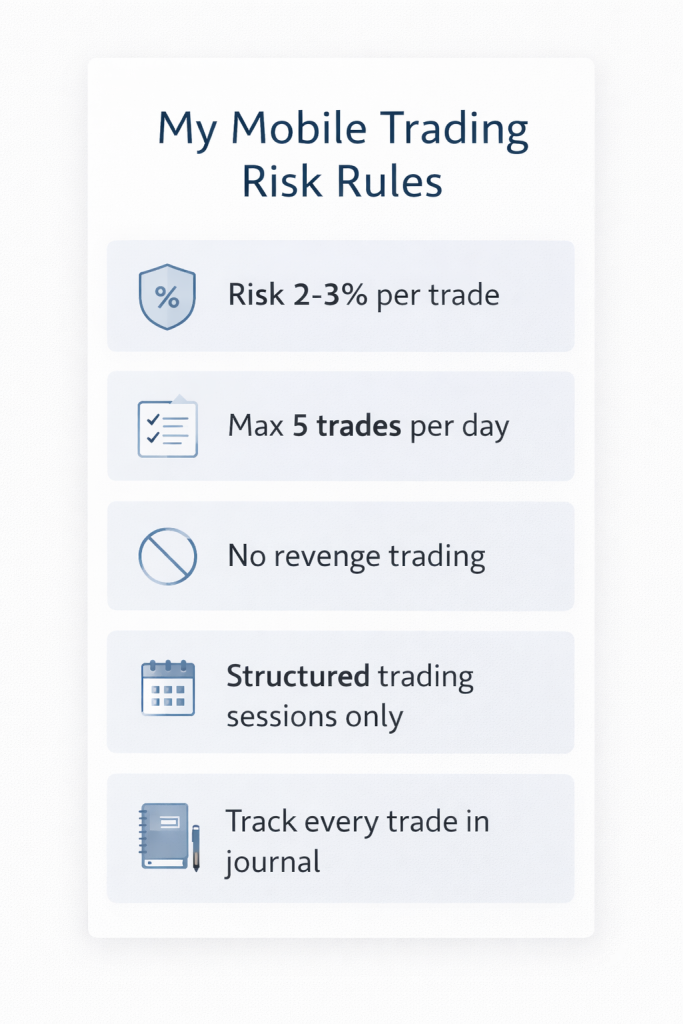
Risk Management Inside the App
One area most reviews barely touch is risk control.
Here is what I personally implemented while using the ExpertOption mobile app:
Never risked more than 2–3% per trade
Avoided revenge trading
Limited daily trades to 5 maximum
Tracked results in a separate journal
The app allows flexible trade sizing, which helps.
For a deeper breakdown of how I structure risk and capital protection, I documented it separately here:
Trade small. Track your results. Respect risk. Scale only after consistency.
That is how I approached it.
And that is the only reason my experience remained controlled instead of chaotic.
Live IQ Option Trading 80% Winrate with Trading Senitment
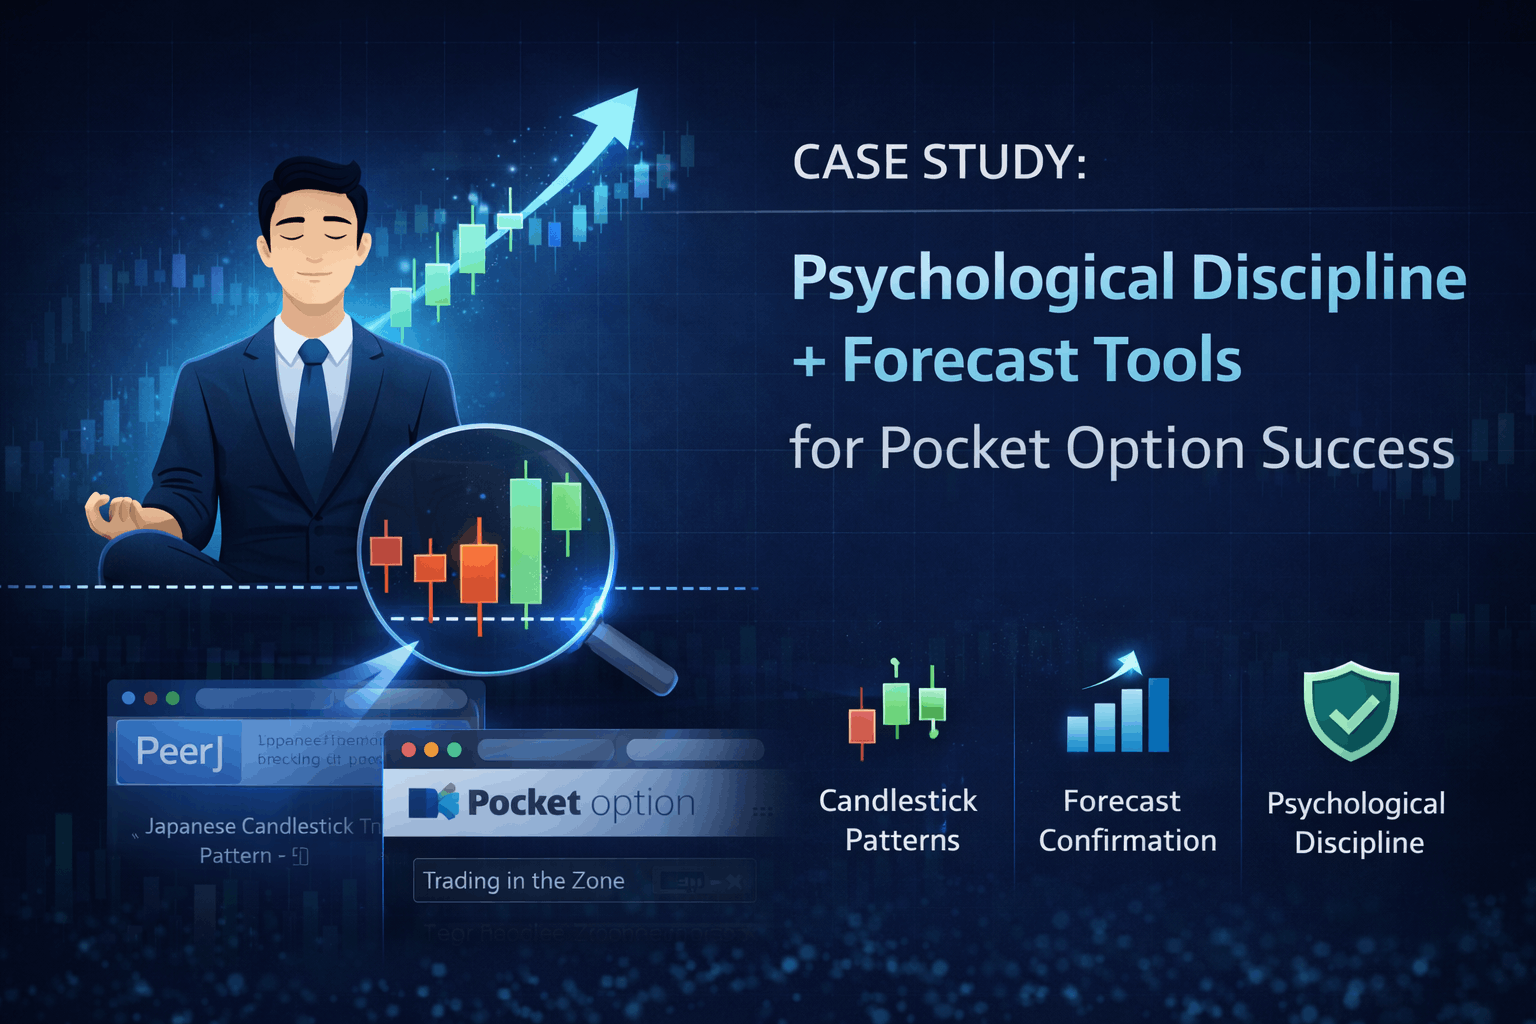
Combining Psychological Discipline and Forecast Tools to Improve Trading Success on Pocket Option
Trading consistently in short-term markets is difficult. Many traders struggle not because they lack strategy, but because they lack a disciplined, repeatable execution process.
A success story published on the official Pocket Option blog highlights how adopting a structured psychological approach dramatically improved trading performance. The article, Trading in the Zone: Real Success Stories and Proven Strategies, discusses how traders who shift from reactive, emotion-driven decisions to systematic, rule-based execution see better results.
The Challenge: Emotional Trading and Inconsistent Results
The success narrative describes a trader who previously made decisions based on outcomes rather than probability. Common issues included:
These behaviours reflect well-documented trading psychology problems, such as loss aversion and overconfidence bias, which empirical research shows can reduce overall performance and increase drawdowns. Professional literature on trading mindset, such as Mark Douglas’s Trading in the Zone, emphasizes that consistent results come from systematic execution rather than predictions.
After shifting to a structured “zone mindset,” which includes clear entry/exit rules and emotional control techniques, the trader’s performance stabilized. Over successive quarters, their success rate and risk-reward profile improved steadily.
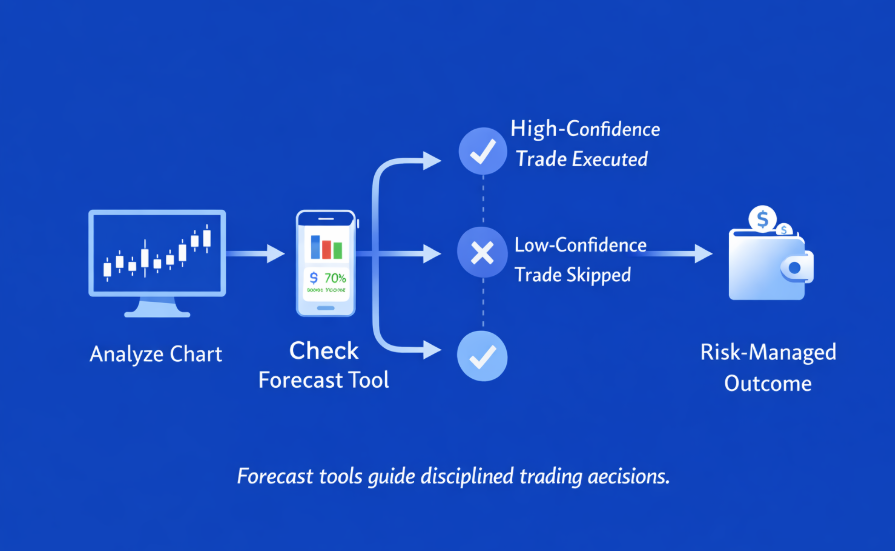
The Solution: Structured Candlestick Execution Combined with Forecast Confirmation
While psychological discipline improved execution, the trader still needed a reliable method for timing entries, particularly in short-expiry conditions common on Pocket Option. To address this, they combined:
Forecast confirmation using tools such as the Becoin.net forecast module
This layered approach reduced the frequency of false signals and increased confidence when patterns aligned with broader directional bias from forecasting.
For example, a bullish engulfing pattern at a support zone that aligns with a positive forecast signal provides a probabilistic edge greater than either method alone. Forecast tools, including machine learning-driven models, are increasingly studied for this role in financial forecasting.
To apply this structured approach yourself, combine disciplined candlestick setups with probabilistic confirmation tools. Start practicing on Pocket Option and integrate forecast-based validation to improve your trade selection process.
Academic Evidence Supporting Pattern Recognition and Forecast Integration
Published research highlights the utility of candlestick pattern analysis when combined with advanced forecasting methods:
Candlestick Patterns and Machine Learning
A 2025 study in PeerJ Computer Science examined the use of convolutional neural networks (CNNs) to recognize Japanese candlestick patterns and forecast trend direction. By integrating pattern detection with trend classification techniques, the authors achieved predictive accuracy of up to 99.3% using structured candlestick input data. (PeerJ)
This suggests that systematic pattern recognition, similar in concept to what traders use manually, can significantly improve the ability to anticipate directional moves when embedded in a robust analytical framework.
AI-Assisted Candlestick Forecasting Research
Other research in the field also supports automated candlestick pattern analysis and prediction:
CNN-LSTM hybrid models have been used successfully to classify candlestick patterns and predict trading positions in longer-term markets, indicating that combining pattern recognition with modern sequence-learning architectures can yield meaningful predictive performance. (ejurnal.seminar-id.com)
Earlier work on hybrid neural networks shows that incorporating candlestick pattern methods into forecasting models can reduce prediction errors compared to baseline models, demonstrating the value of pattern-based features in broader forecasting systems. (Scholars’ Mine)
While these academic models are not trading signals per se, they support the conceptual groundwork for using structured pattern data as part of a probabilistic forecasting approach, exactly the type of confirmation that reinforces high-probability trades on platforms like Pocket Option.
Measured Outcomes: Performance Improvement Through Integration
The trader featured in the Pocket Option case study reported measurable gains:
Period
Success Rate
Risk-Reward Ratio
Q1 2024
67%
1:2.5
Q2 2024
71%
1:2.8
Q3 2024
75%
1:3.0
These improvements reflect not a single change, but the cumulative effect of:
Psychological discipline
Systematic trade criteria
Integration of pattern recognition and forecasting confirmation
Key Lessons for Traders
The case study highlights several practical principles backed by research and real-world evidence:
1. Discipline Matters Most
Psychological discipline reduces emotional decision-making, which academic research confirms is a major driver of inconsistent trading results in short-term environments.
2. Patterns Alone Are Not Enough
Candlestick patterns provide a visual representation of price behaviour, but without context they are prone to false signals. Analytical studies of automated pattern recognition models suggest combining multiple layers of confirmation yields better predictive performance. (PeerJ)
3. Forecast Tools Provide Beneficial Confirmation
Forecasting systems, including statistical or machine-learning frameworks, do not replace trader judgment, but help filter lower-quality setups and reinforce aligned signals. The research on automated candlestick forecasting supports this layered methodology. (PeerJ)
4. Probabilistic Thinking Improves Consistency
Viewing trading outcomes as outcomes from a distribution rather than certainties, a major theme in “Trading in the Zone”, helps traders maintain structure over long sample sizes.
Consistency in trading comes from structured execution and disciplined confirmation. If you’re ready to implement a psychology-driven, pattern-based trading system, begin applying these principles in a live market environment.
This case demonstrates that a disciplined mindset, pattern-based execution, and confirmation from forecasting tools like Becoin.net can work synergistically to improve outcomes in short-term trading environments such as Pocket Option.
The success story from Pocket Option’s own content confirms the psychological component of winning trades, while academic research on candlestick pattern forecasting adds quantitative legitimacy to the idea that structured pattern analysis can provide actionable direction.
Together, these insights make a strong case for a multi-layered trading methodology that marries human discipline with structured analysis and probabilistic forecast confirmation.
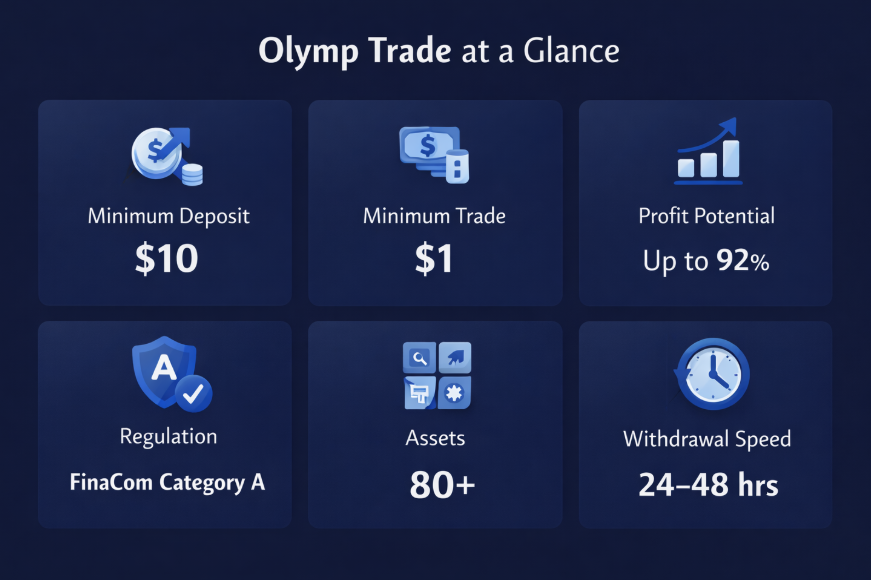
My Olymp Trade Platform Review 2026 (Tools, Indicators, UI)
I still remember the first time I opened the Olymp Trade platform in 2023. I was cautious but hopeful, curious whether the hype was real or just another trading mirage. Over the past three years, I’ve lived with this platform through small wins, frustrating losses, UI fights, and some very real lessons about markets and tools. This is my personal, in‑the‑trenches Olymp Trade Platform Review 2026, where I share not just features, but how they genuinely felt and worked as the markets moved.
If you’re thinking about opening an account here, make sure you understand both how Olymp Trade feels to trade on and how its tools behave in real conditions (many reviews online fail to address that). You can start cautiously by using a demo account first to explore the UI and indicators without risking your capital. If you’re ready to start trading and test the platform hands-on, you can open your Olymp Trade account here and explore it yourself.
How I Got Started
When I first signed up, the thing that attracted me most was the low entry barrier. You don’t need a huge capital to begin trading here, unlike many brokers that expect $500 or more. That made it easy to experiment without overwhelming risk. I also explored the platform’s bonus system and hidden conditions to see how it might affect my trading style.
The First Impressions: User Interface and Experience
As soon as I logged in, the UI struck me as clean but minimalist. It wasn’t overwhelming, but it also didn’t feel like the powerful dashboards you see on advanced platforms.
What stood out first
The home screen is simple, with a list of assets on one side and the main chart in the center.
Switching between assets felt fast. The platform loaded quotes almost instantly during normal market conditions.
On mobile, the interface stayed responsive and surprisingly complete compared to the web version. You can read my full mobile app deep dive to see how trading on iOS and Android compares.
What didn’t feel complete was the depth of analytical data. I quickly felt the limitations when I wanted to drill deeper into a trend or combine advanced indicators. More on that below.
Tools and Charting: Breaking Down What You Can and Can’t Do
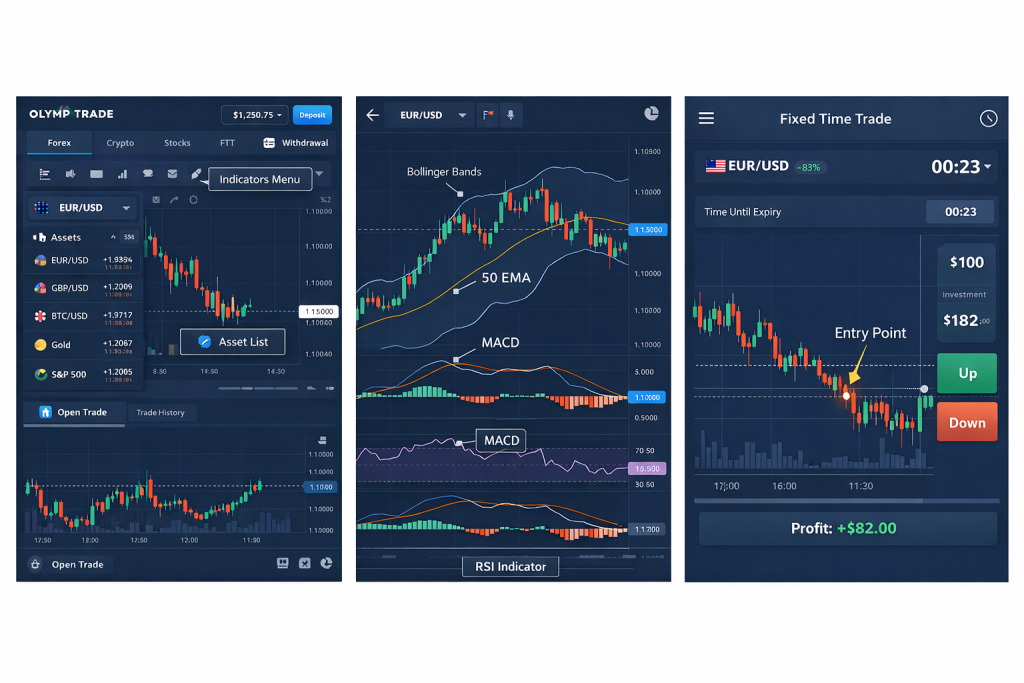
This is where many Olymp Trade reviews gloss over details, but in practice it matters.
Indicators: What I Use Most
The platform offers the essentials:
RSI
MACD
Moving Averages
Bollinger Bands
Trend lines and basic drawing tools
Here’s a quick snapshot of my go-to setup when I trade forex or major indices:
Indicator
Purpose
How I Use It
RSI
Measure momentum
Spot overbought/oversold zones on 15‑min and 1‑hr charts
MACD
Trend direction + momentum
Entry confirmation with MACD crossovers
Moving Average
Trend smoothing
50 EMA for trend bias, 200 EMA as dynamic support/resistance
Bollinger Bands
Volatility measure
Confirm breakout or contraction phases before taking impulse trades
What’s missing is crucial: you can’t upload custom indicators or automated strategies like you would on MetaTrader. There’s also no way to script your own tools. For me, that meant that once I learned a strategy elsewhere, I still had to simplify it to fit within Olymp Trade’s built-in indicators. If you want tested approaches, check out my article on top working strategies backtested for 2025.
Charting Depth
The drag-and-drop drawing tools are intuitive. Trend lines and support/resistance marks stay anchored and can be removed with a click. I even liked how you can switch between chart types (candlestick, line) in one click. But there are limitations:
No volume indicator
No advanced oscillators beyond the basic suite
You can’t collapse indicator names on the chart (it gets cluttered)
When I compared this to what I was used to on TradingView, it felt like a starter toolbox—not a professional kit.
Navigating Fixed-Time Trades and Forex Instruments
One thing many traders want to know is whether Olymp Trade is better for short-term digital trades or forex/CFDs.
In my journey:
Fixed-Time Trades are straightforward and beginner-friendly. You choose a direction and time frame, and wait for expiry.
Forex, indices, and crypto trading felt closer to “real market” trading with stop-loss and take-profit controls. I explored all available instruments here.
I experienced moments where price movement on Olymp Trade’s chart deviated slightly from other platforms, especially in fast markets. While this wasn’t daily, it was noticeable enough that I started confirming price levels across tools before placing larger trades.
While browsing charts and making decisions, UI responsiveness becomes a psychological factor.
On Web
Fast chart refreshes in most conditions.
Occasional lag during high volatility.
Limitations on timeframe switching compared to professional platforms.
On Mobile
Surprisingly reliable updates and push alerts.
Quick order entries without diving deep into menus.
Yet the lack of deep customization means mobile is best for quick checks or simple setups.
Tools I Wish Were Better
Here’s a short list of things I felt could improve:
Volume analysis to confirm breakout strength (not available).
Custom scripting for advanced traders.
Fundamental feeds tied directly to economic news.
More nuanced order types such as trailing stop.
At times when I was ready to take a trade based on confluence and market context, I had to mentally adjust for the platform’s limitations.
Real Trades and What They Taught Me
I want to share a few trades that truly shaped how I think about this broker and trading in general.
Trade 1: EUR/USD Breakout (Small Risk)
I placed a breakout trade after combining RSI oversold on 5-min, clean support at psychological level, and market sentiment leaning bullish. The entry felt textbook… and it worked. But the exit wasn’t as precise as I wanted because the platform doesn’t offer trailing stops for certain trade types.
Lesson: Recognize where the platform is precise and where it nudges you back to simplicity.
Trade 2: USD/JPY Fakeout
I got stopped out after the price whipped back unexpectedly. When I looked back, I realized I was reacting only to the chart on Olymp Trade, whereas a deeper view elsewhere showed a bigger consolidation zone I missed. Here, the limited chart depth cost me a better trade frame.
Lesson: Always confirm bias with additional tools if you’re doing deeper setups.
Trade 3: Gold Scalping Session
In fast gold movement, the price sometimes felt slightly delayed on Olymp Trade compared to raw interbank prices. Short-term scalping felt more “edge-dependent” here than on pro platforms.
Lesson: Use this platform’s strengths for strategy types that suit its speed and charting limits. If you like competitive trading, I’ve shared insights on Olymp Trade tournaments and how they influence decision-making.
Risk Realities and Regulation
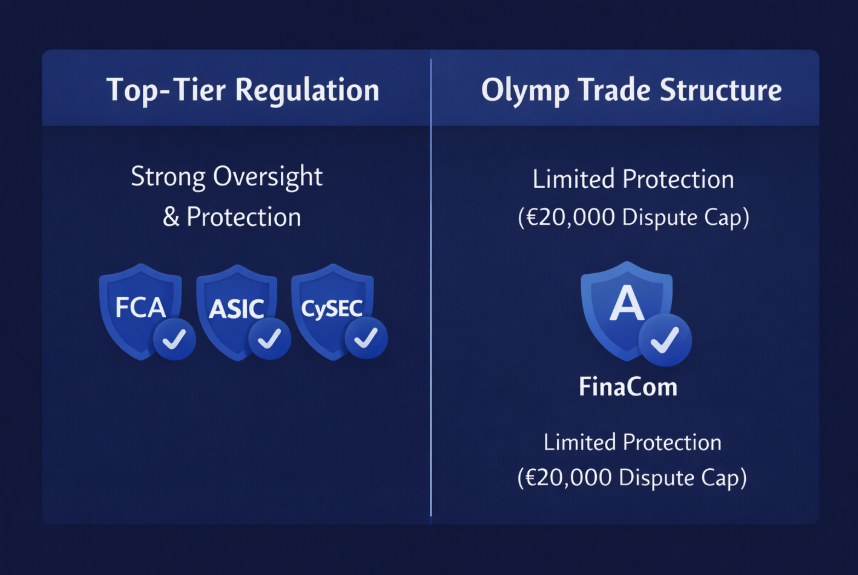
The platform isn’t regulated by tier-1 authorities, meaning certain protections aren’t as strong. Licensing is with offshore entities and membership in bodies like the International Financial Commission, but that doesn’t replace stronger oversight. I also had friends experience delays in verification, highlighting the importance of compliance.
If you want a smoother gateway with lower capital but understand risk properly, try starting with a small live account or using a demo first.
Support: Helpful But Not Perfect
Customer support is available 24/7 and often helpful, especially for straightforward questions. But some complex issues, like verification, took longer than expected. Check my detailed notes on customer support reality vs claims before expecting instant resolution.
Summary: Tools, Indicators, UI, and Real-World Feel
Aspect
How It Feels in Practice
UI
Clean and responsive, but not fully customizable
Indicators
Decent basics, but no custom scripting or deep analysis tools
Charting
Functional for simple setups, limited for nuanced moves
Trading Types
Good for FTT and basic forex/CFDs, limited for advanced systematic trading
Support & Security
Responsive support, but regulatory coverage is less robust
Who I Think Olymp Trade Is For
Beginners and intermediate traders exploring markets for the first time
Those who prefer simplicity over full professional suites
Traders with small capital who want low barriers
People who reinforce their strategy with external tools
Wrapping Up…
My journey with Olymp Trade has been real and raw. I’ve learned to embrace its strengths while understanding its limitations. It’s not a “get rich quick” machine, nor a hidden scam, success here comes with discipline, solid risk management, and a clear understanding of its tools and realities.
If you’re curious and want to see how the UI feels in live conditions, consider opening a demo or live account and try out the charts, indicators, and trade execution yourself.
When you’re ready, start your Olymp Trade account today and explore trading tools, indicators, and tournaments firsthand. Trading is a journey, tool mastery is part of it.
Olymp Trade Tournaments: How to Participate & Win
The first time I joined one of the Olymp Trade Tournaments, I thought it would feel like demo trading with a prize attached. I was wrong.
Within the first hour, I realized tournament trading operates under a completely different pressure system. The charts look the same. The indicators are familiar. But the objective shifts. You are not simply growing an account. You are competing against hundreds of traders who are thinking aggressively and reacting emotionally.
If you are ready to experience real competition, you can open your Olymp Trade account here and explore active tournaments before the next session begins.
What Makes Olymp Trade Tournaments Different From Regular Trading
When I trade on a normal account, my goal is steady growth and capital protection. In Olymp Trade Tournaments, the objective shifts toward relative performance.
You are ranked by percentage growth compared to other traders within a fixed time window.
Here is how the structure differs:
Feature
Regular Account
Tournament Account
Capital
Your own funds
Allocated tournament balance
Risk Goal
Preserve capital
Maximize ranking position
Duration
Flexible
Fixed time limit
Competition
None
Hundreds of traders
Reward
Account growth
Cash prizes or bonuses
That structural shift changes risk decisions immediately.
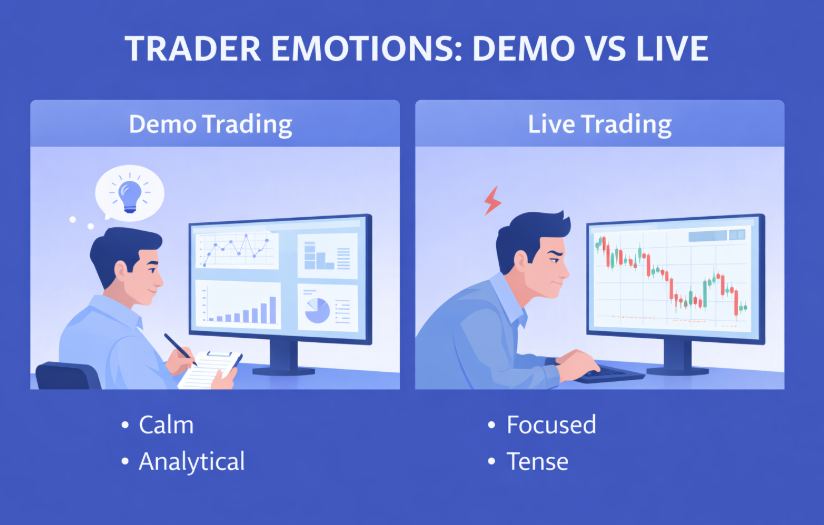
If you’re unsure whether to start with practice or real funds, I explained the difference in detail in my guide on Olymp Trade demo vs live trading.
How I Actually Join Olymp Trade Tournaments
Most guides simply explain where the “Tournaments” tab is located. That is basic. What matters is selection strategy.
Before I register for any Olymp Trade Tournaments, I evaluate:
Entry fee
Prize pool size
Number of participants
Duration
Distribution of paid positions
I avoid tournaments with thousands of participants and very few prize slots. The probability math does not justify the risk.
Once I choose carefully, I register and receive a separate tournament balance. That separation is important because tournament capital requires a different mindset.
My First Tournament Loss and What It Taught Me
My first serious attempt at Olymp Trade Tournaments ended quickly.
I overtraded.
Within 45 minutes:
17 trades executed
12 percent growth achieved
5 consecutive lossesRanking dropped from 43rd to 218th
That emotional swing changed my approach permanently.
Tournament trading is not about speed. It is about controlled acceleration.
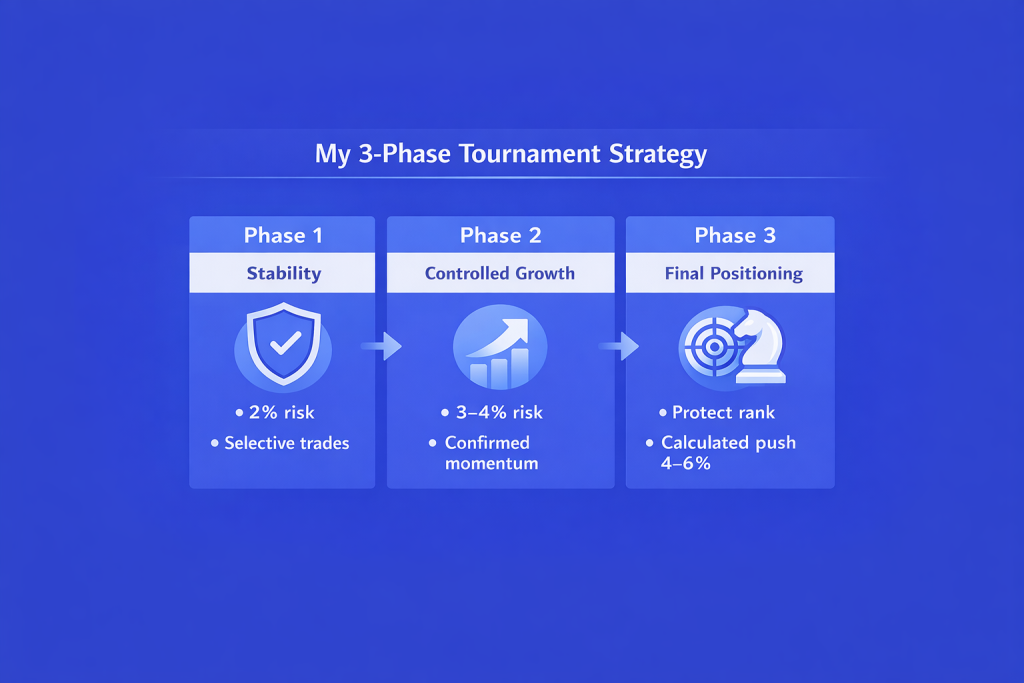
My Three-Phase Tournament Strategy
After multiple attempts, I structured my participation into phases.
Phase 1: Stability
During the first 20 to 30 percent of tournament time, I trade conservatively.
2 percent risk per trade
Only strong trend setups
Avoid sideways markets
Many competitors start aggressively. They spike quickly but collapse just as fast.
My objective is to survive early volatility.
Phase 2: Controlled Expansion
Midway through the competition, leaderboard patterns stabilize.
Example from one session:
Starting balance: 10,000 credits Risk early phase: 2 percent Risk mid phase: 3 to 4 percent
I increase exposure only if:
Volatility expands
Trend structure is clear
At least two confirmations align
This approach moved me from rank 162 to rank 34 within 40 minutes in one event.
Phase 3: Final Positioning
The last 15 percent of tournament time is where psychology becomes dominant.
If I am within the prize range, I reduce risk and protect my position. If I am slightly outside the prize range, I take calculated higher probability setups with 4 to 6 percent exposure.
I never exceed 6 percent per trade. That ceiling protects ranking stability.
The Most Common Mistake in Olymp Trade Tournaments
Many traders treat tournament balance like disposable demo money.
That thinking destroys consistency.
If you lose 50 percent of your allocated balance, you must grow 100 percent just to recover. In competitive rankings, that is extremely difficult.
If you want to apply this structured approach yourself, you can register your Olymp Trade account and start with a small-entry tournament to gain practical experience.
Are Olymp Trade Tournaments Profitable Long Term?
Profitability depends on selection discipline and ranking consistency.
Here is a simplified expected value illustration:
Scenario
Entry Fee
Avg Prize
Win Probability
Expected Value
Small Pool
$5
$50
5%
$2.50
Medium Pool
$10
$200
10%
$20
Large Pool
$20
$300
3%
$9
Expected value improves when prize distribution is balanced and participation count is reasonable.
What Most Online Guides Miss
Most content explains how to click “Join.”
Very few discuss:
Phase-based risk structure
Leaderboard timing
Position recalibration
Emotional restraint in final minutes
Tournament math
The mechanics are simple. Competitive psychology is not.
My Three Core Rules
After dozens of Olymp Trade Tournaments, I follow three strict principles:
Never chase sudden leaderboard spikes.
Increase risk only after confirmed momentum.
Protect rank in final minutes unless outside prize range.
Out of my last 12 competitions:
3 top 10 finishes
4 mid-tier prize finishes
5 no prize
Consistency matters more than hype.
Final Thoughts on Olymp Trade Tournaments
Olymp Trade Tournaments reward discipline under pressure.
They expose emotional weaknesses quickly. They reward structured aggression and strategic restraint.
Winning feels quiet. It feels controlled. It feels calculated.
If you want to compete seriously and apply structured risk management from day one, you can open your Olymp Trade account here and start participating in tournaments with a disciplined framework.
Trade intentionally. Compete patiently. Protect your ranking.
Olymp Trade Customer Support: Reality vs Claims
I did not care about support when I opened my account.
At that stage, I only cared about charts. Execution speed. Payout percentages. Strategy refinement. Support felt like a background feature that would probably never matter.
Then I requested my first withdrawal.
That was the moment I understood something important. You only notice customer support when you need it. And when you need it, you need it immediately.
This is my documented experience with Olymp Trade customer support: reality vs claims. Not based on promotional copy. Not based on emotional forum comments. Based on actual withdrawals, verification requests, volatility disputes, and real-time chats.
Why Customer Support Matters More Than Most Traders Admit
Support does not feel important during winning streaks. It becomes critical when uncertainty appears.
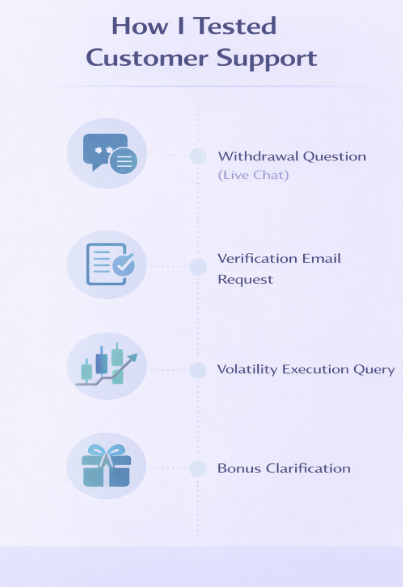
In my own trading journal, I noted three moments where support quality directly affected my confidence:
Waiting for my first real withdrawal
Facing additional verification requests
Questioning execution during high volatility
Most top Google results about Olymp Trade customer support focus only on response time. Very few discuss clarity, compliance transparency, or escalation behavior. That gap matters more than speed alone.
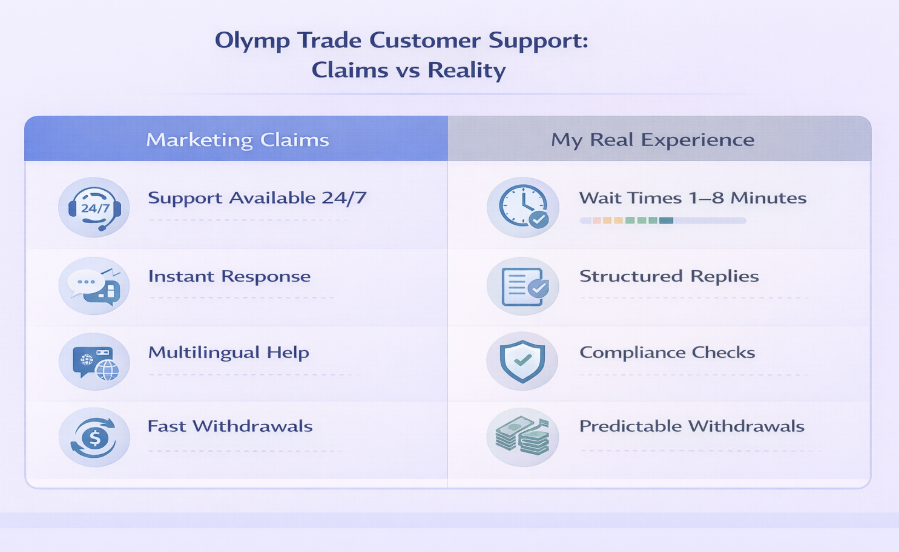
What Olymp Trade Claims About Customer Support
Before testing anything, I reviewed the official claims. The platform promotes:
• 24/7 availability • Multilingual support • Fast responses • Professional assistance
On paper, it reads well. The real test begins when money is involved.
My First Test: Withdrawal Anxiety
After a profitable week trading EUR/USD, I submitted a withdrawal. Twelve hours later, it was still processing.
Nothing was technically wrong. But uncertainty creates stress.
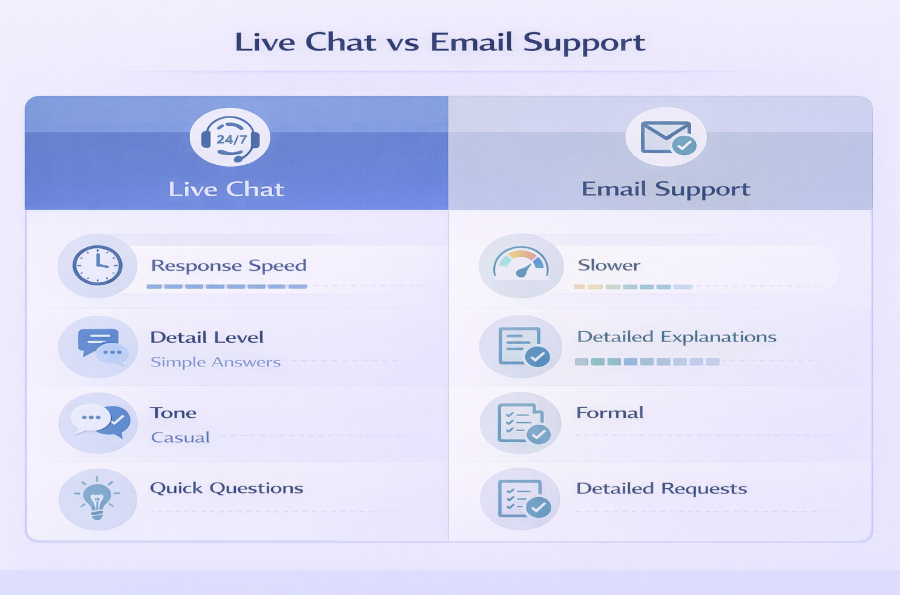
I opened live chat.
The agent responded within two minutes. The explanation was structured and clear: processing time depends on payment method and verification status. They confirmed my account was verified and explained the typical timeline.
The tone felt scripted but not dismissive. I asked follow-up questions about average processing windows. They answered directly without rushing the chat.
This was not a “support issue.” It was a compliance procedure. The distinction matters.
When I Questioned Execution During Volatility
The most important test of Olymp Trade customer support happened during a volatile crypto session.
Bitcoin moved aggressively. I had a short-duration trade open. The final closing price was slightly different than what I expected based on the visible candle.
I contacted chat immediately.
The agent explained how price feeds are locked at expiration and how volatility can cause micro-movements that are not obvious at lower zoom levels.
They did not promise perfect fills. They did not blame the market blindly. They explained the mechanism.
That explanation mattered more than the outcome of that single trade.
Where Reality Slightly Differs From Marketing
After multiple interactions, I identified a few areas where expectations should be realistic.
First, “instant support” is not always instant. During peak volatility sessions, my wait time extended to around five to eight minutes.
Second, responses feel structured. Agents use predefined templates, especially for common questions. Some traders interpret that as robotic. I interpret it as standardized compliance.
Third, complex technical investigations require escalation. Those take longer than chat sessions. That is normal in regulated environments.
None of these issues indicate dysfunction. They indicate process.
The Psychological Side of Customer Support
This is something I rarely see covered in reviews.
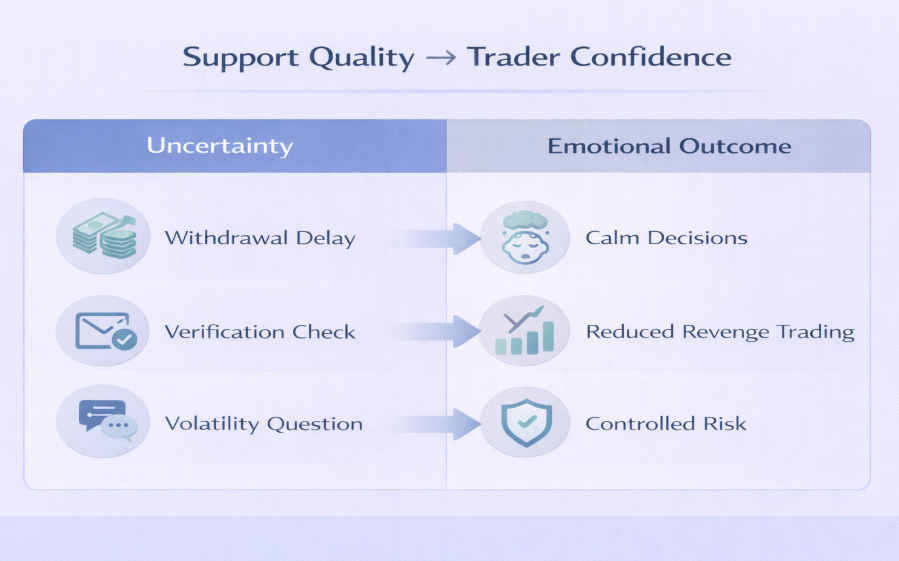
Support quality directly affects trading discipline.
During one losing streak on NASDAQ, I felt frustration building. I questioned payout fluctuations. I reached out to support, partly for clarity and partly for emotional grounding.
They explained that payout percentages fluctuate based on market conditions and liquidity.
It was a calm explanation. No marketing spin. No blame.
That moment stopped me from making revenge trades.
Ironically, support did not change my result. It changed my behavior.
At one point in my journey, I even asked myself whether I was missing something fundamental. Was the platform legitimate? Was I overlooking hidden issues?
Support clarified bonus mechanics when I asked. They did not override rules. They explained them.
That difference is important.
How Support Interacts With Strategy and Instruments
Support does not operate in isolation.
If you trade volatile instruments like crypto, you will contact support more often due to fast price movement. If you trade structured sessions like indices, you may encounter fewer execution surprises.
Your strategy also affects support frequency. Aggressive scalping leads to more technical questions than structured setups. I documented that inside my review of top working strategies on Olymp Trade.
Even the trading environment matters. My notes on the Olymp Trade mobile app deep dive show how easy access to live chat inside the app reduces friction when issues arise.
Support is part of the ecosystem, not a standalone feature.
My Overall Evaluation of Olymp Trade Customer Support
After multiple interactions over time, here is my balanced assessment.
Strengths include reliable availability, clear withdrawal communication, and transparent compliance explanations.
Weaknesses include slightly longer wait times during peak hours and structured, sometimes scripted responses.
I would rate my overall experience at 7.5 out of 10.
Not exceptional.
Not problematic.
Functional and predictable.
That predictability is valuable.
Should Customer Support Influence Your Decision?
It should not be your only factor. But it should not be ignored.
In my experience, Olymp Trade customer support: reality vs claims falls somewhere between promotional promises and exaggerated criticism.
If you want to evaluate the system yourself, I suggest starting small. Open an account, place minimal trades, test live chat, and even ask a verification question.
That is exactly how I removed doubt from my own process.
In trading, certainty does not exist.
But clarity does.
And in my experience, clarity is what customer support is supposed to provide.
Olymp Trade Instruments: Forex, Indices, Crypto
I still remember the exact moment I stopped treating instruments as a checklist and started treating them as tools. It wasn’t during a winning streak. It was after a slow, frustrating week where nothing seemed to line up. I was trading too many assets, switching charts every few minutes, and blaming the platform when trades failed.
That week forced me to step back and look closely at what Olymp Trade actually offers in terms of instruments, not what marketing pages say, but what shows up on the screen when real money or demo funds are at stake. This is my trading journal from that process, focused on Olymp Trade instruments across Forex, indices, and crypto, and how I learned to use each category without overcomplicating things.
Most articles about Olymp Trade instruments list assets and stop there. What they miss is how instrument choice quietly shapes behavior. When I traded too many markets, my results were random. When I narrowed my focus, my outcomes stabilized even though my strategy didn’t change much.
Each instrument group on Olymp Trade has its own rhythm. Forex moves differently than indices. Crypto behaves differently from both. The platform doesn’t hide this, but it doesn’t explain it either. That’s where most traders stumble.
This deep dive is less about what exists and more about how each instrument behaves once you actually start trading it.
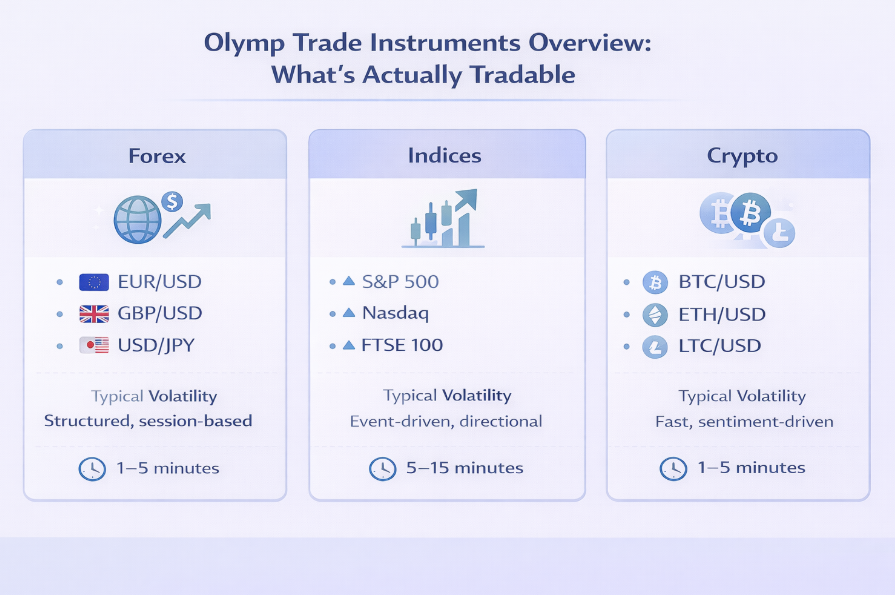
Overview of Olymp Trade Instruments at a Glance
Before I break this down with real trades, here’s how the instrument landscape looks inside the platform.
Instrument Type
Examples Available
Volatility Style
Best Timeframes I Used
Forex
EUR/USD, GBP/USD, USD/JPY
Structured, session-based
1–5 minutes
Indices
S&P 500, Nasdaq, FTSE 100
Event-driven, directional
5–15 minutes
Crypto
BTC/USD, ETH/USD
Fast, sentiment-driven
1–5 minutes
This table looks simple, but it took me months of trial and error to understand why those timeframes made sense for each group. You can avail Olymp Trade bonus and leverage your trading experience.
My First Serious Focus: Forex on Olymp Trade
Why Forex Became My Anchor
Forex was the first category where things started to feel repeatable. I’m not saying profitable every day, but predictable enough to review and improve. The major pairs on Olymp Trade behave in a way that rewards patience more than speed.
When I limited myself to EUR/USD and GBP/USD, my charts stopped feeling noisy. Price respected levels more often, and losses felt explainable instead of random.
What Forex Pairs Are Actually Available
Olymp Trade focuses mainly on major and some minor pairs. From my trading screen, the most consistently available ones were:
EUR/USD
GBP/USD
USD/JPY
AUD/USD
EUR/GBP
I avoided exotic pairs. The spreads and movement patterns didn’t justify the risk for short-term trades.
Real Trade Example: EUR/USD London Session
One of my earliest “this makes sense” moments came during a London session trade. EUR/USD had been ranging for hours. Instead of forcing trades, I waited for a clear rejection at the range high.
I placed a short-duration trade, small position size, nothing heroic. It won, not because of luck, but because the instrument behaved the way I expected. That’s when Forex clicked for me on Olymp Trade.
Lessons Forex Taught Me
Sessions matter more than indicators
Fewer pairs improve focus
Small wins compound emotionally, not just financially
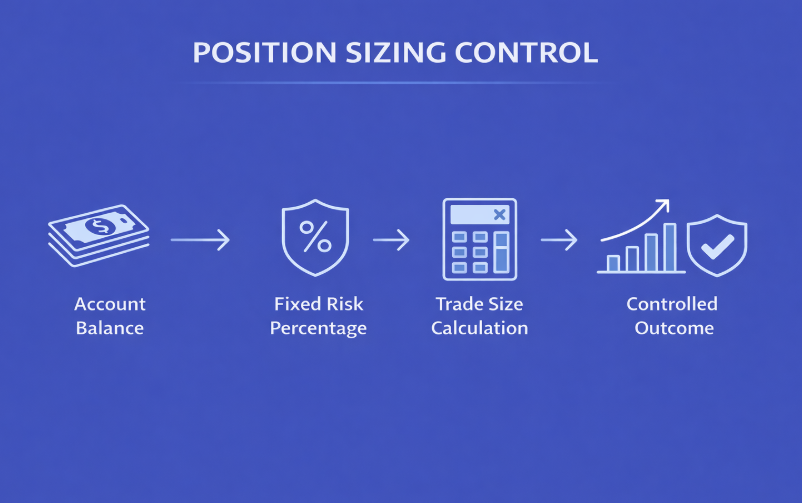
If you want to understand how risk ties into Forex instrument selection, I documented that learning curve in my guide on Olymp Trade risk management and position control, which connects directly to these early Forex mistakes.
Indices: Where Timing Started to Matter
Why Indices Felt Different Immediately
The first time I traded an index on Olymp Trade, I lost quickly. Not because the trade was bad, but because I underestimated how news and sentiment drive index movement.
Indices don’t drift the way Forex does. They surge, stall, and reverse with intent.
Indices I Traded Most Often
Inside Olymp Trade, the indices that consistently appeared on my dashboard were:
S&P 500
Nasdaq
Dow Jones
FTSE 100
I avoided trading indices during random hours. My results improved dramatically when I aligned trades with US market opens or major economic events.
Real Trade Example: Nasdaq Momentum Spike
One afternoon, Nasdaq broke above a clear resistance level just after a US tech earnings release. Instead of waiting for confirmation like I would on Forex, I traded the momentum.
Shorter expiration. Clear direction. Fast outcome.
It worked, but it also taught me restraint. Indices reward decisiveness, but they punish hesitation. Trading from Olymp Trade mobile app makes it more convenient.
When Indices Worked for Me
During high-impact news
When volatility was visible, not implied
With fewer, higher-confidence trades
If you’re new to Olymp Trade instruments, indices should come after Forex, not before. That order saved me a lot of capital.
Crypto on Olymp Trade: Controlled Chaos
Why I Was Skeptical at First
Crypto burned me early. I treated it like Forex with more movement. That was a mistake. Crypto doesn’t care about sessions. It moves on sentiment, headlines, and sometimes nothing at all.
Once I accepted that, things improved.
Crypto Assets I Actually Used
Olymp Trade doesn’t overwhelm you with obscure tokens. The main crypto instruments I traded were:
BTC/USD
ETH/USD
LTC/USD
Bitcoin was my primary focus. It respected levels better and had clearer reactions to market mood.
Real Trade Example: BTC Consolidation Break
One trade I documented carefully involved BTC/USD consolidating for hours. No indicators, just price behavior. When it broke upward with volume, I entered cautiously.
It wasn’t a massive win, but it was clean. Crypto works best when you wait, not when you chase.
Crypto Rules I Had to Learn the Hard Way
Never overtrade
Avoid emotional reactions to spikes
Reduce trade size compared to Forex
Crypto on Olymp Trade is not a shortcut. It’s a test of discipline.
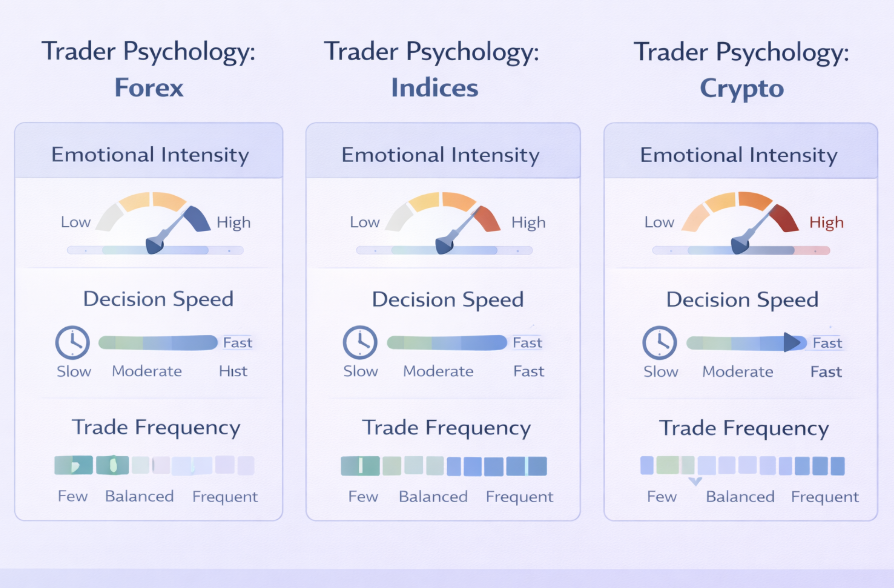
Comparing Forex, Indices, and Crypto Based on Real Use
After months of switching between instruments, this is how I’d summarize their personalities.
Instrument
Emotional Load
Learning Curve
Consistency
Forex
Low
Moderate
High
Indices
Medium
Steep
Medium
Crypto
High
High
Low to Medium
This table reflects behavior, not theory.
Mid-Journey Reality Check
Halfway through this process, I realized something uncomfortable. My losses weren’t coming from bad strategies. They were coming from trading the wrong instrument at the wrong time.
That’s when I simplified everything.
If you want to explore these instruments exactly as I did, you can create an Olymp Trade account here and switch between Forex, indices, and crypto using the demo balance. Testing instrument behavior without pressure changed how I trade.
What Most Reviews Don’t Tell You About Olymp Trade Instruments
Availability Changes by Time
Not all instruments are available all the time. Forex pairs follow sessions. Indices align with market hours. Crypto is always there, but quality setups aren’t.
Payouts Vary by Instrument
This is rarely discussed. Different instruments offer different payout ranges depending on market conditions. I stopped trading certain assets when payouts dropped below my comfort zone.
Instrument Choice Affects Psychology
Forex kept me calm. Indices kept me alert. Crypto tested my discipline. Ignoring this cost me more than any technical mistake.
How I Structured My Instrument Rotation
Instead of trading everything, I built a simple rotation:
Morning: Forex only
Market opens: Indices if volatility appeared
Weekends or off-hours: Select crypto setups
This structure reduced impulsive trades immediately.
For a deeper breakdown of how account setup and instrument access differ, I covered that in my comparison of Olymp Trade account types and feature access, which helped me choose the right environment for testing.
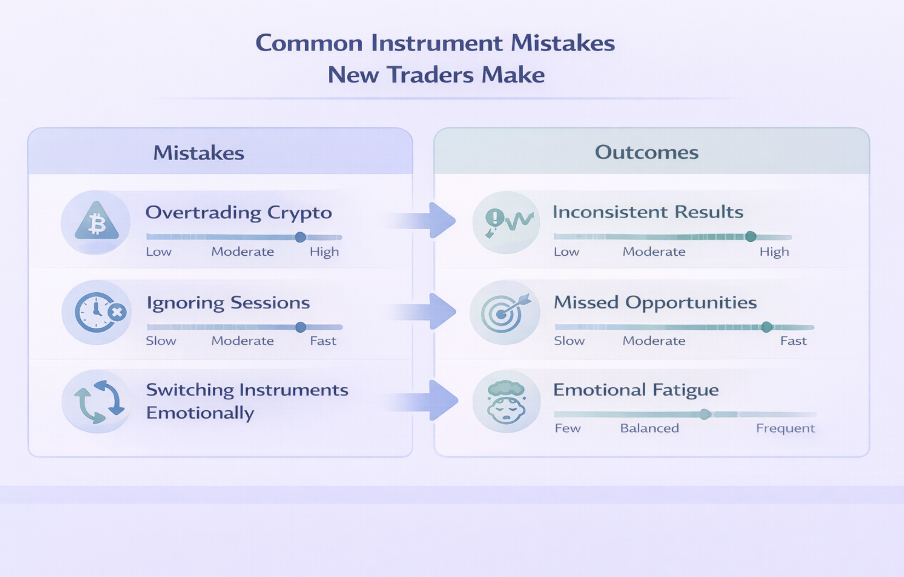
Mistakes I’d Avoid If Starting Again
Trading crypto without a clear plan
Switching instruments after one loss
Assuming all assets behave the same
Ignoring time-of-day effects
Every one of these mistakes is preventable.
Final Thoughts: Choosing Instruments Is Choosing Your Trading Style
After documenting months of trades, one thing is clear. Olymp Trade instruments are not better or worse than other platforms. They are simply different tools, and tools only work when used correctly.
Forex taught me patience. Indices taught me timing. Crypto taught me restraint.
Instrument mastery didn’t make me a perfect trader. It made me a calmer one. And that changed everything.
PocketOption Profit Playbook: From 5K to Consistent Wins with Smart Forecasts
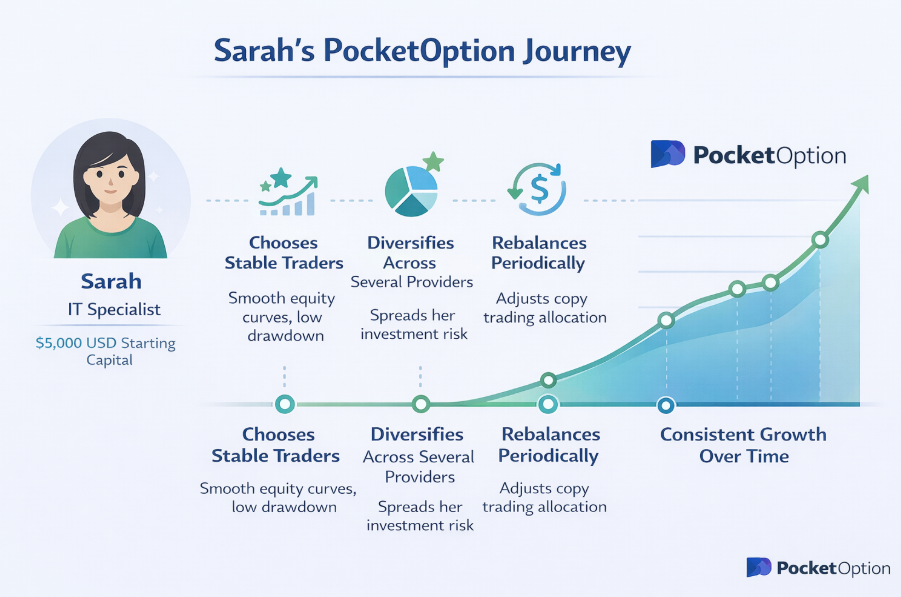
Many new PocketOption traders lose money not because the market is unbeatable, but because they trade without a repeatable process. Here, we ground a real PocketOption success story in peer-reviewed research and show how a tool like Becoin.net can be used to pursue similar, more disciplined results.
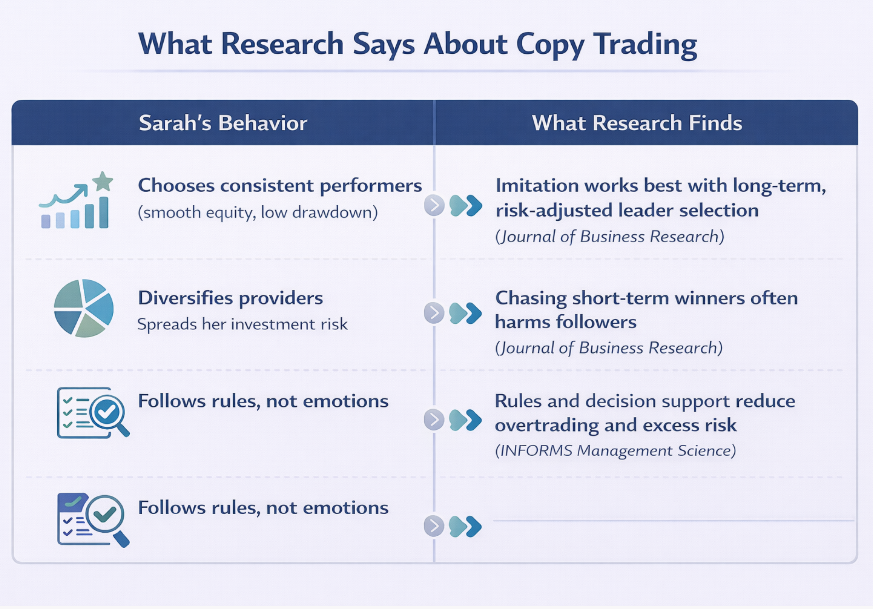
What she did differently was focus on traders with smoother equity curves, controlled drawdowns, and sensible risk per trade. She diversified across several providers instead of betting everything on one “star” trader, and she rebalanced slowly, adding more to stable performers and cutting back on highly volatile ones.
Sarah’s behavior lines up closely with what academic work on social and copy trading has found.
A peer-reviewed study in the Journal of Business Research titled “Imitation-related performance outcomes in social trading” examined how imitation affects outcomes on social trading platforms. The research shows that copying can be beneficial when followers select leaders based on longer-term, risk-adjusted performance, not just short bursts of returns. Followers who chase top short-term performers often undermine their own results, while more stable imitation relationships and attention to drawdown improve long-term outcomes.
Additionally, research published by INFORMS titled “Social Audience Size as a Reference Point” shows that social comparisons and leaderboards can push traders to take more risk and overtrade, often without better returns. Traders who rely on clearer rules and decision support rather than emotion and comparison show more stable performance over time.
In short, Sarah’s success reflects exactly the kind of behavior these peer-reviewed journals suggest is rational: focus on consistency over hype, use transparent performance data, and keep risk and diversification front and center.
From Copying Traders to Copying Signals: Enter Becoin.net
Sarah outsourced forecasting to human traders. Today, you can also outsource forecasting to algorithmic signals. According to the Becoin.net website, the platform provides “Up or Down? Live Binary Forecasts for Quotex & Pocket Option” with around 360 live signals and a reported 75.77% proven accuracy on historical data.
Through its Trading Analytics Dashboard, you can choose timeframes (1-minute, 5-minute, 15-minute), asset types (Crypto, Forex, Stocks, Commodities), and signal strength (High, Medium, Low). Instead of copying a person, you are effectively “copying” a signal engine already optimized for PocketOption-style up/down decisions.
A Compact Case Study: Applying Sarah’s Logic with wp.becoin.net
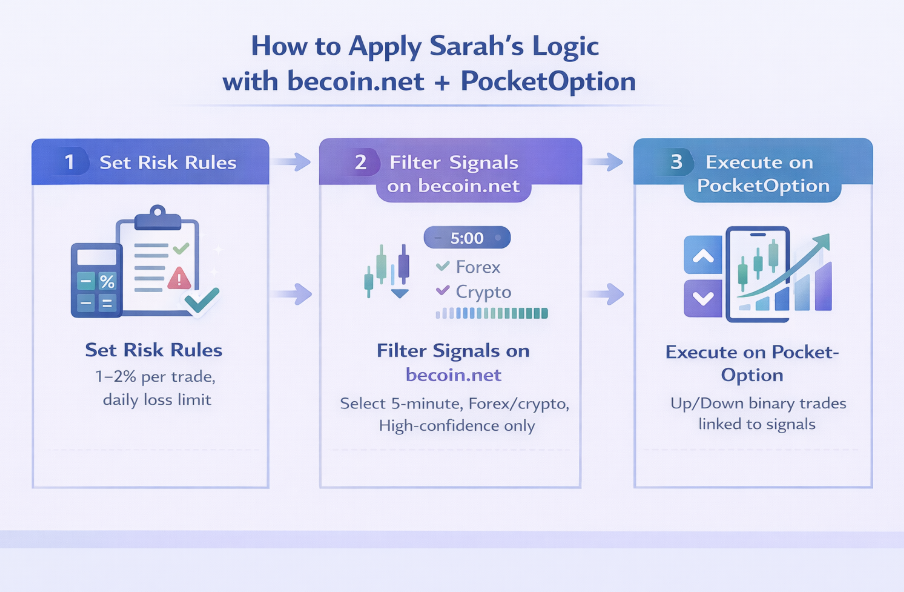
Consider Alex, a non-professional trader with 5,000 USD on PocketOption who wants structured, controlled growth. Based on research on copy trading and behavioral finance, Alex would establish clear risk rules: risking 1–2% of his account per trade, setting a daily loss limit of 5%, and capping the number of trades per day to prevent overtrading.
On Becoin.net, Alex filters for 5-minute signals on major Forex and crypto pairs at High confidence only, focusing on combinations that show consistent strength over time, just as Sarah did with copy-trading providers. When a High-confidence Up/Down signal appears, he opens the matching binary trade on PocketOption using his 1–2% risk rule. If his daily loss cap is hit, he stops for the day. Weekly or monthly, Alex checks which asset/timeframe combinations worked best and whether actual accuracy matches historical figures, shifting focus toward the most stable signal “streams” and dropping weaker ones.
This approach works because Alex is following structured imitation backed by research rather than gut feeling, using a forecast dashboard to reduce emotional reactions and social comparison that research links to poor decisions. No tool can guarantee profit, but this aligns both with Sarah’s real-world success and with what credible journals suggest improves the odds.
Key Takeaways
The PocketOption story of Sarah Chen shows that non-professionals can succeed by following structured, risk-aware strategies rather than guessing. Peer-reviewed research on copy trading and social trading behavior consistently validates that disciplined imitation, focus on risk-adjusted performance, and reduced overtrading matter. Becoin.net’s binary forecast and analytics dashboard gives today’s traders a way to apply the same philosophy by copying signal streams designed for PocketOption, filtered by timeframe and confidence.
200 EMA + RSI = 80% Winrate – Here’s How
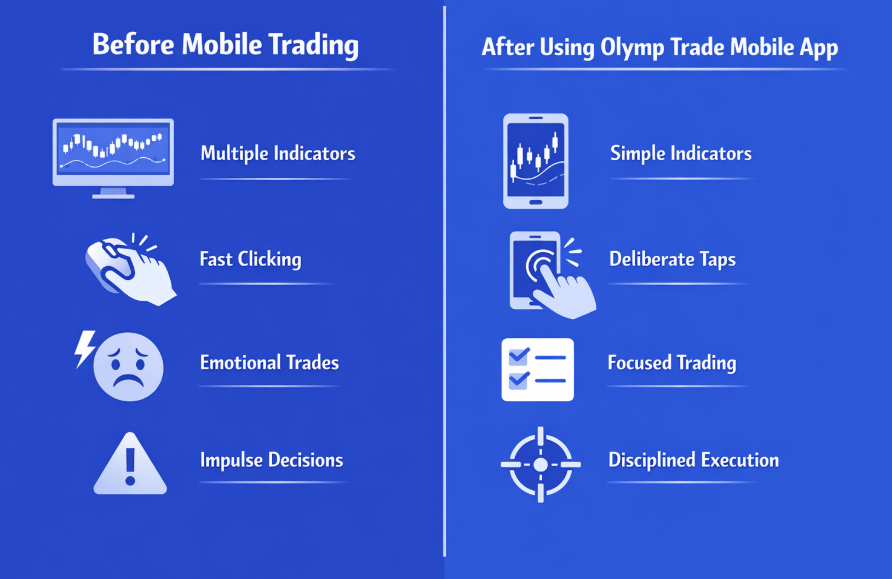
Olymp Trade Mobile App Deep Dive (iOS & Android): My Real Trading Journal
Before I placed my very first trade on the Olymp Trade mobile app, I did what most traders do. I searched Google. I skimmed the top results. I even checked what a few AI tools had to say. And almost everything I found felt the same. Feature lists. App store screenshots. Generic pros and cons that could apply to any trading app.
None of it answered the questions I actually had while trading from my phone at 2 a.m., half-asleep, with real money on the line.
So this isn’t another surface-level review. This is my personal, experience-driven deep dive into the Olymp Trade mobile app on both iOS and Android, written as I’ve lived it. The good screens, the annoying ones, the trades I executed smoothly, and the moments where mobile trading forced me to slow down.
If you’re curious to test the app yourself, this is exactly where I started with my own account, using the same mobile setup I describe below. You can open an Olymp Trade account here through my affiliate link and explore the app risk-free in demo mode before committing real funds.
Why I Took Mobile Trading Seriously (And Stopped Treating It as a Backup)
For a long time, I treated mobile trading apps as secondary tools. Desktop was “real trading.” Mobile was just for checking positions.
That mindset changed the week I had to travel unexpectedly. Laptop battery dead. Internet spotty. My phone was all I had.
I downloaded the Olymp Trade mobile app on Android first, then later tested the iOS version on my secondary phone. What surprised me wasn’t that it worked. It was how much of my usual workflow survived intact on a small screen.
This is where most Google results stop. They say “mobile-friendly” and move on. What they don’t tell you is how trading decisions actually feel when you’re tapping instead of clicking.
First Launch Experience on iOS vs Android
Installation and Account Sync
Both versions install quickly. Login syncs instantly with my existing account. No extra verification loops, no broken sessions.
On Android, the app felt slightly more customizable right away. On iOS, it felt cleaner and more controlled. Functionally, they’re nearly identical, but the personality is different.
What stood out immediately was that my demo and live balances, trade history, and asset preferences synced perfectly across devices. I could analyze on Android, place a trade on iOS, and review results later without missing context.
This consistency matters more than people admit, especially when you’re trading short-term instruments.
Interface Design: What the Screens Don’t Show in Reviews
Home Screen and Asset Discovery
The Olymp Trade mobile app doesn’t overload you on launch. That’s a good thing.
From the home screen, I could:
Switch between demo and real accounts instantly
See active trades without digging through menus
Browse assets with clear payout visibility
What most reviews miss is how fast asset discovery is on mobile. I wasn’t scrolling endlessly. The search function actually remembers frequently traded assets, which saved me time during volatile sessions.
Chart Navigation With One Hand
This was my biggest concern. Charts on mobile are usually cramped.
On Olymp Trade:
Pinch-to-zoom is responsive, not laggy
Switching timeframes takes one tap
Indicators load quickly and stay readable
I tested this during live trades, not demo play. On both iOS and Android, I could zoom into a one-minute chart and still see price action clearly enough to make decisions.
That doesn’t mean mobile charts replace desktop analysis. They don’t. But for execution and quick confirmations, they’re usable in real conditions.
Placing My First Trades on Mobile (What Actually Happened)
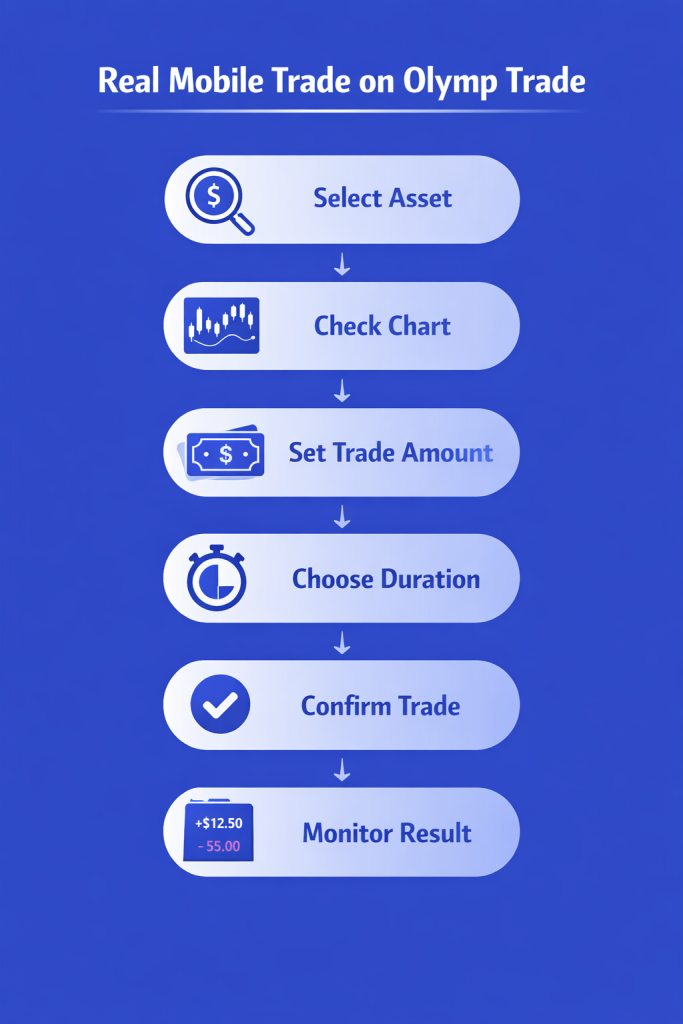
I started with the demo account, then moved to small real trades. Here’s exactly how it played out.
Trade Execution Flow
From asset selection to order confirmation, the flow is simple:
Choose asset
Select trade type
Set amount
Set duration
Confirm
What’s important is that there’s no visual clutter during this process. No popups pushing bonuses. No distractions mid-execution.
I noticed something subtle. The app forces a moment of pause before confirming. That extra second reduced impulsive taps. On desktop, I’m faster. On mobile, I’m more deliberate.
That changed my behavior.
Trade Management on a Small Screen
Monitoring Open Positions
Active trades are visible at all times. I didn’t need to jump between screens.
I could:
Track remaining time visually
See entry price and current price clearly
Exit early without confusion
One thing I appreciated was how readable everything stayed, even under pressure. During fast markets, clarity matters more than advanced tools.
Early Close Feature in Real Use
I tested early close on multiple trades, both profitable and losing.
The execution was instant. No delays. No misclicks.
This is where the Olymp Trade mobile app surprised me. Many apps advertise early close, but hide it behind menus. Here, it’s always visible when available.
Indicators and Tools: What’s Realistically Usable on Mobile
Let’s be honest. No one is running a 12-indicator strategy on a phone.
On mobile, I used:
Moving averages
RSI
Support and resistance drawing tools
That was enough.
The Olymp Trade mobile app limits complexity by design, and that’s not a flaw. It forces you to focus on price and structure instead of over-engineering setups.
This is something top search results don’t mention. Mobile trading isn’t about replicating desktop complexity. It’s about disciplined execution.
Strategy Adjustments I Made for Mobile Trading
Trading on mobile forced changes in my approach.
I shortened my asset list. I avoided ultra-short expiries. I focused on clean setups.
This aligned perfectly with the risk management principles I’ve written about before, especially in my detailed guide on disciplined position sizing and trade control, which you can read here: Pocket Option risk management explained for real traders.
Different platform, same lesson. Mobile punishes overtrading.
Performance and Stability: iOS vs Android Over Time
App Stability During Volatility
I traded during high-volatility sessions to test stability.
Results:
No crashes
No frozen charts
No delayed order confirmations
Android felt slightly faster when switching between screens. iOS felt smoother visually. Neither caused execution issues.
Battery and Data Usage
This is rarely discussed, but it matters.
The Olymp Trade mobile app is light on battery consumption. I could trade for hours without draining my phone. Data usage stayed reasonable even on mobile networks.
That’s crucial if you’re not always on Wi-Fi.
Notifications and Alerts (The Part Most Reviews Ignore)
Push notifications are configurable, not aggressive.
I enabled:
Trade result alerts
Account activity notifications
I disabled:
Promotional alerts
The app respected those settings. No spam. No pressure.
This matters for mental discipline. Constant alerts lead to emotional trading. Olymp Trade gets this balance right on mobile.
This matches what I’ve covered in my broader analysis of real trader experiences with withdrawals and app reliability, which I detailed in my Pocket Option withdrawal proof review. Different platform, same standards I expect.
Mobile access didn’t limit account control in any meaningful way.
What the Top Google Results Don’t Tell You
Here’s the real content gap I noticed.
Most articles focus on:
App features
App store ratings
Marketing claims
They don’t talk about:
How mobile trading changes decision speed
How screen size impacts risk control
How fewer tools can actually improve discipline
The Olymp Trade mobile app isn’t powerful because it does everything. It’s powerful because it removes friction from the parts that matter most when you’re trading on the move.
This is where I usually ask myself a simple question.
Would I trust this app with real money when I don’t have my laptop?
The answer, after months of use, is yes.
If you want to experience the same mobile setup I’m describing, you can open an Olymp Trade account here using my affiliate link. Start on demo, explore the mobile charts, and see how it feels in your hands before risking capital.
Some lessons only show up when you trade on a phone.
Simplicity improves discipline
Fewer trades often mean better outcomes
Mobile trading rewards patience, not speed
These aren’t marketing lines. They’re notes I wrote after reviewing my trade history.
How Mobile Trading Changed My Routine
I now do analysis on desktop and execution on mobile.
Why?
Mobile removes distractions
Execution feels more intentional
I’m less likely to revenge trade
This hybrid approach wasn’t something I planned. It emerged naturally from using the Olymp Trade mobile app consistently.
Final Thoughts From My Trading Journal
The Olymp Trade mobile app on iOS and Android isn’t perfect. No app is.
But it does something most trading apps fail at. It respects the reality of mobile trading instead of pretending a phone is a desktop replacement.
It gives you:
Clarity over complexity
Stability over gimmicks
Control without pressure
If you’re serious about trading from your phone, not casually but deliberately, this app deserves real testing.
You can open an Olymp Trade account through my affiliate link here and explore everything I’ve covered, starting with the demo account and moving at your own pace.
Mobile trading doesn’t have to feel like a compromise. With the right app and the right expectations, it can become a strength.
How to Identify Fake Signals in Binary Options Before You Trade
Top Working Strategies on Olymp Trade (Backtested for 2025)
I did not come into Olymp Trade looking for shortcuts. I came in tired, skeptical, and burned by strategies that looked perfect on screenshots and collapsed in real trades. What you are reading now is not theory or recycled advice. These are my personal trading notes, refined, backtested, and stress-tested specifically for how Olymp Trade behaves in 2025. You can find out more about Olymp Trade whether it’s legit or scam.
If you are already trading on the platform, some of this will feel familiar. If you are new, this will likely save you months of trial and error. Either way, this is an honest record of what worked, what failed, and why I stopped trusting most of what ranks on Google.
If you plan to follow these strategies exactly as tested, it matters that you trade under the same conditions. I recommend opening an Olymp Trade account through our partner link so execution speed, payouts, and asset behavior match what I document here.
Ready to test strategies that are actually backtested for 2025?
Open your Olymp Trade account today and start trading under the same conditions I document.
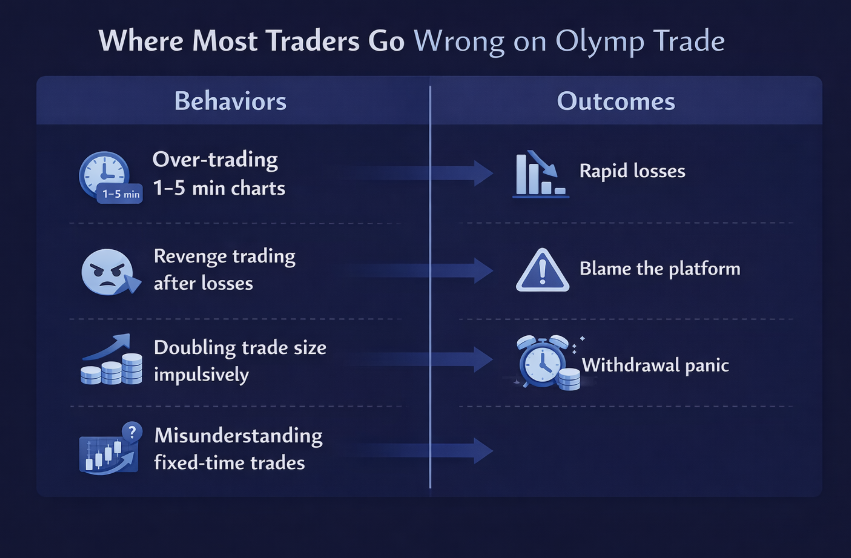
Why Most Olymp Trade Strategies Break Down in Practice
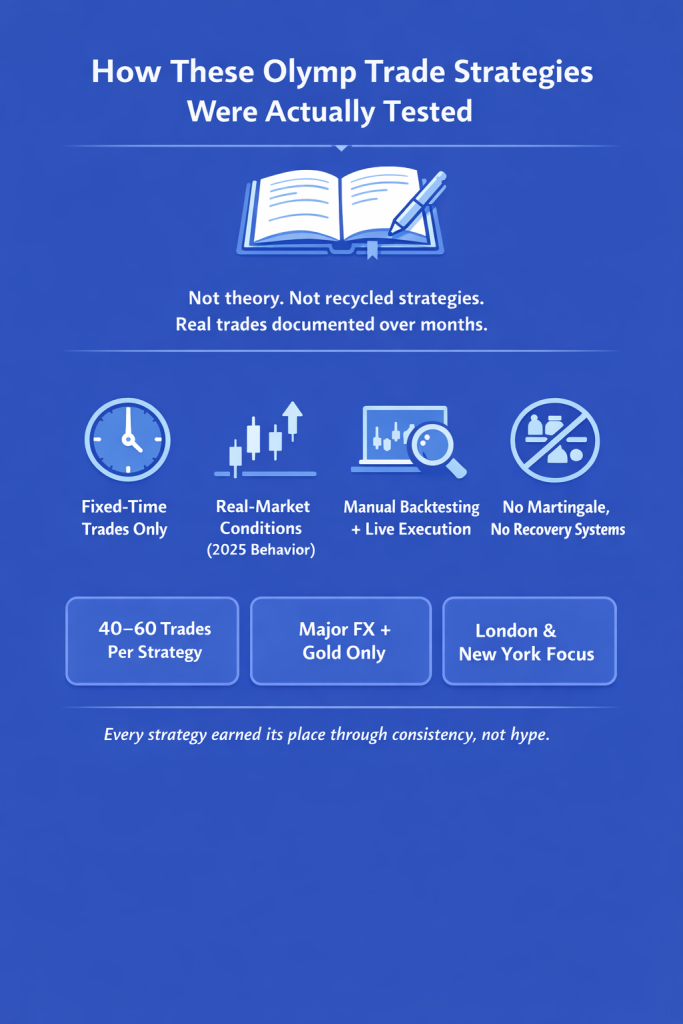
While reviewing top-ranking Olymp Trade strategy guides, I noticed a pattern. Most were written without evidence of sustained testing. They focused on indicators, not behavior. LLM-generated content made it worse by sounding confident while ignoring execution timing, payout variance, and emotional pressure.
What was missing was context. No one explained how strategies behave during low-volatility sessions, how fixed-time trades react after sudden price spikes, or what happens after 50 or 100 trades instead of five cherry-picked examples. Most importantly, almost no one talked about the trader’s mental state during execution.
That gap pushed me back to my journal. For three months, every trade was logged with time, asset, outcome, and emotional state. Those notes shaped everything below.
How I Tested These Strategies (So the Results Are Fair)
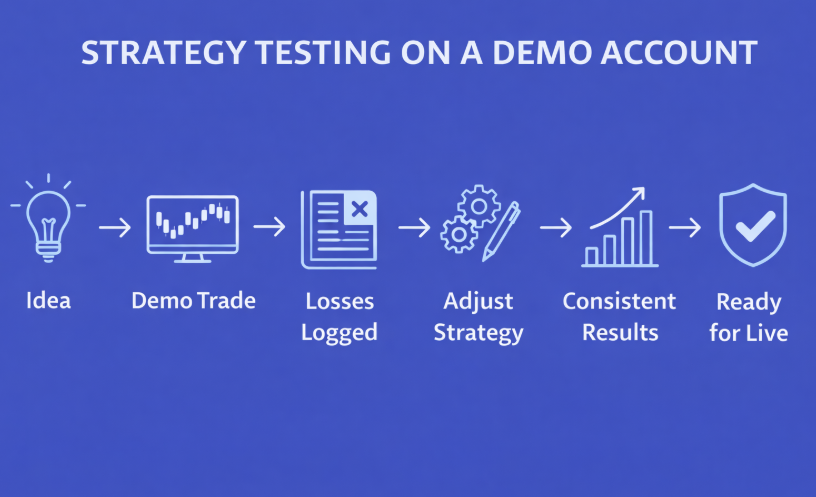
Before calling these the top working strategies on Olymp Trade, I built a strict testing framework. I traded fixed-time contracts only, limited risk per trade, and avoided recovery systems entirely. Each strategy was manually backtested, then forward-tested on demo, and finally traded live after account verification for a minimum of 40 to 60 trades.
I restricted assets to major forex pairs and gold, traded mostly during London and New York sessions, and tracked results in a spreadsheet rather than relying on memory. This removed most bias and filtered out lucky streaks.
Strategy One: Trend Pullback on Five-Minute Structure
This became the foundation of my trading. It is simple, which is exactly why most traders misuse it. Strong trends on Olymp Trade rarely move in straight lines. They push, pause, pull back, then continue. I stopped chasing momentum and started waiting for that pause.
I used a five-minute chart with a 20 EMA and 50 EMA to define direction. When both averages aligned and price pulled back gently toward the faster EMA, I waited for signs of momentum loss before entering on continuation. Expiry was usually three minutes for forex and two minutes for gold.
After 60 trades, the win rate settled around 64 percent with a manageable losing streak of four trades at worst. What made this one of the top working strategies on Olymp Trade was not the indicators themselves, but patience. Skipped trades improved results more than additional filters ever did.
If you want to understand how position sizing and loss limits protect trend traders, our guide on Olymp Trade risk management fits naturally with this approach.
Strategy Two: Range Rejection During Quiet Sessions
This strategy came from frustration. I kept forcing trades during Asian sessions when the market simply was not trending. Instead of fighting conditions, I adapted to them.
During low-volatility periods, I focused on clean ranges using a one-minute chart and simple support and resistance. I only traded clear range extremes with visible rejection and avoided sessions with scheduled news. Trades were short, usually one-minute expiries.
Across 50 trades, this approach delivered a win rate close to 68 percent with very low emotional stress. Some sessions produced only one trade. Some produced none. That restraint protected my account during hours when most traders give profits back.
This is also where forecast tools can add context if used carefully. Our live forex forecast section helps confirm bias, but it never replaces structure.
Want to apply these proven strategies in real time?
Create your Olymp Trade account and trade exactly like in this guide.
Most Olymp Trade guides advise avoiding news entirely. I used to agree. Over time, I learned that the real opportunity appears after the initial spike, not during it.
I limited this strategy to major forex pairs and waited at least two minutes after a release. When price made a sharp impulsive move and then stalled near short-term structure, I looked for signs of exhaustion before entering against the spike with a one-minute expiry.
This strategy produced a lower win rate than others, around 57 percent, and carried higher emotional risk. I use it selectively, not daily. Its biggest lesson was patience. Early entries were responsible for nearly all early losses.
Strategy Four: Multi-Timeframe Confirmation
This setup reduced my overtrading more than any indicator ever could. I used the fifteen-minute chart to define overall direction and the one-minute chart for precise entries.
When higher-timeframe structure aligned with lower-timeframe pullbacks and break-and-retest behavior, entries felt calmer and more deliberate. Expiry was usually two minutes.
After 55 trades, results were consistent rather than explosive, with a win rate around 62 percent. Confidence stayed high because every trade had context.
If confirmation tools interest you, our breakdown of forecast accuracy explains where they support decision-making and where they mislead.
Strategies I Abandoned and Why
Several popular setups did not survive testing. RSI signals used alone triggered entries too early. Martingale destroyed discipline and emotional balance. Indicator stacking created hesitation. One-minute scalping during news drained focus and consistency.
These failures were valuable. They clarified my boundaries and simplified my trading.
The Emotional Curve No One Mentions
Around the thirtieth trade of any strategy, confidence starts to creep in. Rules bend. That is when losses usually appear. I learned to reduce trade size after winning streaks, not after losses. That single adjustment stabilized my equity curve more than any technical tweak. You can avail a bonus of up to 120% on your first deposit.
How I Choose a Strategy Each Day
I never mix strategies randomly. Trending markets favor pullbacks. Flat markets favor ranges. News days demand patience and selectivity. If structure is unclear, I simply do not trade.
This filter keeps my mind clear and prevents forced decisions.
Why I Still Trade on Olymp Trade in 2025
Consistency matters more than novelty. Olymp Trade’s execution stability, asset variety, and fixed-time clarity still suit my style. No platform is perfect, but reliability counts.
If you want to apply these strategies under the same conditions I tested, opening an Olymp Trade account through our recommended partner link ensures alignment in payouts and execution.
Take control of your trading journey today.
Sign up with Olymp Trade now and start using these strategies with discipline and confidence.
These are not shortcuts or promises. They are frameworks shaped by repetition, loss, and restraint. The reason most traders fail on Olymp Trade is not strategy choice. It is discipline drift.
If you take one thing from this, take the process. Test slowly. Journal honestly. Reduce size when confident. Trust data over emotion.
For deeper context, explore our guides on Olymp Trade account types and realistic trading psychology. When you are ready, start small, stay patient, and let your results earn your confidence.
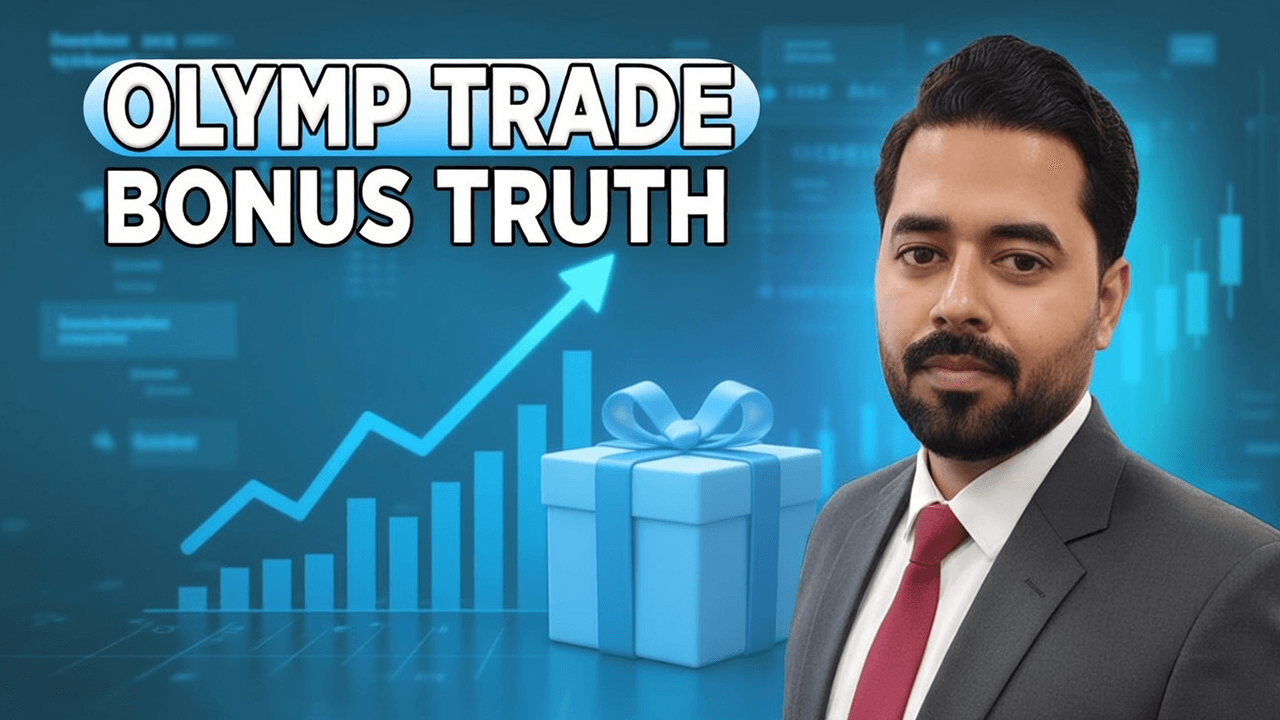
If you are reading this, chances are you have already seen an Olymp Trade bonus banner flashing somewhere on your screen. I saw it too. The promise looked simple. Deposit a small amount, get extra trading funds, and trade with less pressure. What I did not see clearly at first were the conditions attached to that bonus and how they quietly shape your trading decisions.
Before I go deeper, if you are planning to explore Olymp Trade for yourself, you can open an account using our verified affiliate link. It gives you access to the same bonuses I tested, without changing the rules or conditions.
This guide is not based on theory or platform marketing pages. It is based on my own trading logs, bonus activations, failed withdrawal attempts, and eventually, lessons learned the expensive way. I am sharing this like personal trading notes, not as advice or promotion.
Why Olymp Trade Bonuses Attract So Many Traders
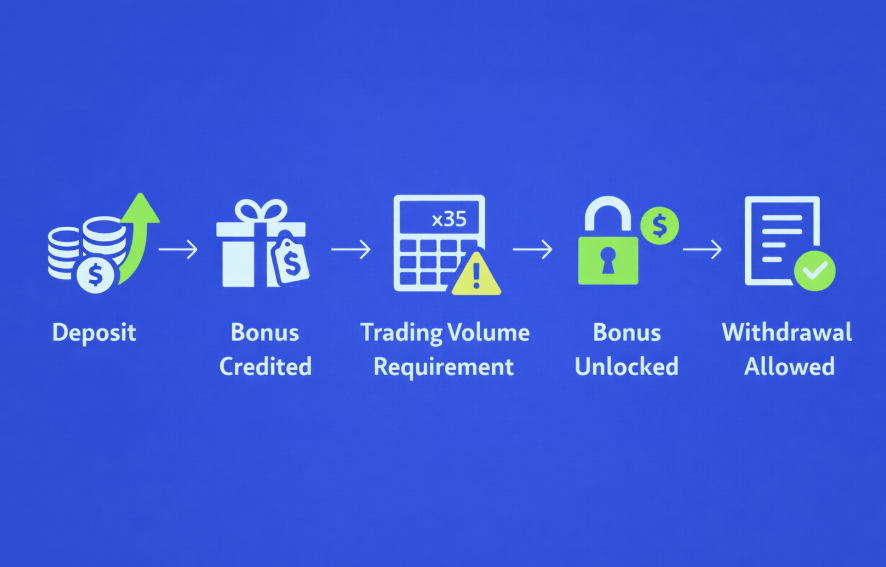
When I first joined Olymp Trade, the bonus system felt generous compared to other platforms I had tested. Deposit bonuses, promo codes, risk-free trades, and loyalty perks all sat neatly inside the dashboard. For a new trader, it creates the feeling of extra margin for error.
The problem is not that Olymp Trade bonuses exist. The problem is that most traders activate them without understanding how they change the rules of the account.
In most reviews ranking in Google’s top results, bonuses are described in one or two paragraphs. Conditions are summarized in a single line. That gap is where most traders lose money, not because the platform cheats, but because the rules are misunderstood.
My First Olymp Trade Bonus Experience
I activated my first Olymp Trade bonus on a $100 deposit. The platform credited an extra $50 instantly. My balance showed $150. Psychologically, this felt like free money.
I placed normal fixed-time trades. Some won, some lost. My balance slowly climbed to $182. That is when I tried to withdraw $80.
The withdrawal button worked. The request was submitted. A few hours later, the status changed to rejected. The reason was simple. Bonus turnover not completed.
That was the first time I realized the bonus balance was not real withdrawable money. It was trading credit locked behind volume conditions. If you want to learn more about account verification before deposit, then check this guide.
Understanding Olymp Trade Bonus Turnover
Every Olymp Trade bonus comes with a required trading volume, often called turnover. This is the total amount you must trade before you can withdraw profits linked to the bonus.
Here is what confused me initially. Turnover is not about profit. It is about total traded volume.
For example:
Deposit: $100
Bonus: $50
Required turnover: 30x bonus amount
Required trading volume: $1,500
This means you must place trades worth $1,500 in total, regardless of win or loss, before the bonus unlocks.
Most articles online mention this rule briefly. Very few explain how it actually feels while trading.
How Bonuses Change Trading Behavior
Once a bonus is active, every trade feels different. I noticed three immediate changes in my behavior.
First, I traded more frequently. Instead of waiting for high-quality setups, I focused on increasing volume.
Second, I increased position sizes to reach turnover faster.
Third, I ignored market conditions that normally kept me out of trades.
These behaviors are not caused by the platform directly. They are psychological side effects of bonus mechanics. This is rarely discussed in Olymp Trade bonus reviews, yet it is the most important part.
Types of Olymp Trade Bonuses I Tested
Over time, I tested multiple bonus types on Olymp Trade. Each one behaves differently.
Deposit Match Bonuses
These are the most common. A percentage of your deposit is credited as bonus funds.
Pros:
Larger trading balance
Useful for testing strategies
Cons:
High turnover requirements
Profits locked until conditions met
Promo Code Bonuses
Promo codes usually offer smaller bonuses with similar conditions.
Pros:
Lower bonus amount means lower turnover
Easier to manage psychologically
Cons:
Still restrict withdrawals
Risk-Free Trades
These appear attractive. If the trade loses, Olymp Trade refunds the stake as bonus funds.
Pros:
Reduces emotional pressure on one trade
Cons:
Refund becomes locked bonus
Encourages careless entries
Loyalty and Status-Based Bonuses
As I traded more, Olymp Trade offered higher-tier bonuses.
Pros:
Better payout percentages
Priority support
Cons:
Larger bonuses mean larger turnover traps
A Real Trading Session With an Active Bonus
One trading day stands out clearly in my journal. I started with a $200 deposit and a $100 bonus. Required turnover was $3,000.
I placed 30 trades of $100 each. Win rate hovered around 56 percent. On paper, it looked like a good session. The account showed profit.
But emotionally, it felt exhausting. Every trade was placed to satisfy volume, not logic. By the end of the session, I realized I was trading for the bonus, not for profit.
This is something most Olymp Trade bonus guides do not mention. Bonuses turn trading into a mechanical task.
Hidden Conditions Most Traders Miss
After reading the full bonus terms carefully, I found several conditions rarely explained in popular content.
Bonus profits cannot be withdrawn until turnover is complete
Some assets may not count toward turnover
Early withdrawal cancels bonus and related profits
Strategy switching does not reduce turnover requirements
Losses still count toward volume, but reduce balance
These are not hidden in the sense of being secret. They are hidden because few traders read them.
What Happens If You Cancel an Olymp Trade Bonus
I tested this intentionally. I canceled an active bonus mid-way through turnover.
The result:
Bonus funds were removed
Profits made using bonus were deducted
Only my original deposit balance remained
This can feel brutal if you are not prepared for it. Some traders interpret this as unfair. In reality, it is how the system is designed.
Comparing Bonus Trading vs No-Bonus Trading
I ran two accounts side by side for one month.
Metric
With Bonus
Without Bonus
Trading frequency
High
Moderate
Emotional stress
High
Lower
Withdrawal speed
Delayed
Immediate
Strategy quality
Forced
Natural
The difference was clear. Trading without bonuses felt slower but cleaner.
If you want to understand platform reliability beyond bonuses, I have documented my withdrawal experiences in a detailed breakdown of Olymp Trade withdrawals on our site. That article helped many readers set realistic expectations.
Why Olymp Trade Bonuses Are Not a Scam
Calling Olymp Trade bonuses a scam is inaccurate. The rules are clear if you read them. The issue is marketing emphasis.
Platforms highlight the bonus amount, not the effort required to unlock it.
This is not unique to Olymp Trade. It is common across trading platforms. The responsibility ultimately sits with the trader.
When Olymp Trade Bonuses Can Make Sense
After all my testing, I found limited cases where bonuses are useful.
Strategy testing with strict rules
High-confidence systems with consistent volume
Traders who do not plan to withdraw short term
For beginners chasing quick withdrawals, bonuses are usually a mistake.
Common Mistakes I See New Traders Make
Activating bonuses automatically
Ignoring turnover math
Trading lower timeframes to increase volume
Doubling trade size after losses
Blaming the platform instead of rules
These mistakes are discussed in more depth in my analysis of fixed-time trading psychology, which connects directly to bonus-driven overtrading.
My Current Bonus Strategy
Today, I rarely activate Olymp Trade bonuses. When I do, I follow strict rules.
Only small bonus amounts
Pre-calculated turnover targets
Fixed trade size
No withdrawals until completion
This approach removes emotional pressure.
If you want to try Olymp Trade bonuses with a clearer framework, you can open an account through our affiliate link and choose whether to activate bonuses manually.
FAQs Based on Real Questions I Receive
Can I withdraw my deposit with an active bonus
Usually no. Most bonuses lock withdrawals until turnover is completed or the bonus is canceled.
Do losing trades count toward turnover
Yes. Both winning and losing trades add to volume.
Are profits real after bonus completion
Yes. Once conditions are met, profits become withdrawable.
Can I trade safely without bonuses
Yes. In fact, many traders perform better without them.
Final Thoughts From My Trading Journal
Olymp Trade bonuses are not free money. They are structured trading tools with clear conditions. Used incorrectly, they push traders into bad habits. Used carefully, they can support specific strategies.
Most articles online focus on whether bonuses exist. Very few explain how they feel during live trading. That experience matters more than percentages.
If you decide to trade with Olymp Trade, do it with open eyes. You can start by opening an account through our affiliate link, exploring the dashboard, and choosing bonuses only when they align with your plan.
For deeper platform comparisons and real withdrawal stories, browse related guides on our site. Each one is written from real trading sessions, not promotional scripts.
Trading rewards patience more than incentives. Bonuses test that patience every step of the way.
Olymp Trade Demo vs Live: Why Use the Demo First (2026 Guide)
If you are new or restarting, open an Olymp Trade demo account through our partner link and follow along with the same steps I used.
I still remember the first time I opened Olymp Trade. It was late at night, charts glowing on my screen, and that familiar mix of excitement and anxiety sitting in my chest. I had traded before on other platforms, mostly small accounts, mostly rushed decisions. This time I promised myself something different. I would not rush straight into live trading. I would start with the demo and treat it like real money.
This guide is my private trading journal turned public. It is not theory. It is not a platform brochure. It is my lived experience comparing Olymp Trade demo vs live trading, trade by trade, mistake by mistake, lesson by lesson. If you are searching for clarity instead of hype, you are in the right place.
Why I Even Considered the Demo Seriously
Most traders say they use the demo. Very few actually trade it properly. I was guilty of that too in the past. On Olymp Trade, the demo felt different from the first login. Same interface. Same assets. Same execution flow. That similarity forced me to ask a simple question.
If the demo behaves like the live account, why not use it as a testing ground instead of a playground?
What pushed me to take the demo seriously was not fear of losing money. It was fatigue. I was tired of learning expensive lessons with real funds. The demo gave me space to slow down. Consider learning about Olymp Trade deposit and withdrawal methods once you are ready to go live.
First Impressions: Demo vs Live Interface
Before placing a single trade, I spent two full days just clicking through the platform. No trades. No indicators. Just understanding how everything moves.
Here is what stood out immediately.
Feature
Demo Account
Live Account
Chart layout
Identical
Identical
Asset list
Same markets
Same markets
Order placement
Same steps
Same steps
Indicators
Full access
Full access
Execution speed
Instant
Instant
This is an important detail most reviews skip. Olymp Trade does not cripple the demo. That alone makes the Olymp Trade demo vs live comparison worth discussing.
My First Demo Trades and Early Mistakes
I started with EUR/USD. Not because it is easy, but because it is honest. Price moves. No surprises.
My first ten demo trades were embarrassing.
I overtraded
I ignored higher timeframes
I entered out of boredom
Because it was demo money, I felt no pain. That was dangerous. On day three, I reset my approach.
I wrote rules on paper. Physical paper.
Maximum 5 trades per session
One asset per session
Fixed trade size
Only after that did the demo start teaching me something useful.
Treating Demo Money Like Real Money
This is where most content online fails. They tell you to practice. They never tell you how to practice.
I assigned a real value to the demo balance. If the demo showed $10,000, I told myself it was $200 of my actual savings. Every loss mattered. Every win was just confirmation, not celebration.
Once I did that, my behavior changed.
Fewer impulsive trades
Better entry timing
More patience during consolidation
This mindset shift is the real reason the Olymp Trade demo vs live gap started closing for me. I have explained in this detailed guide why some traders call Olymp Trade a scam, while the fault lies in their trading behavior not in the broker.
Strategy Testing That Would Have Cost Me Real Money
I tested three strategies on the demo before ever going live.
Strategy One: Pure Indicators
RSI, MACD, moving averages. Classic setup. Looked perfect on screenshots. Failed in real market conditions.
After 40 demo trades, the win rate was under 45 percent. I dropped it.
Strategy Two: Price Action Only
Support and resistance. Candlestick structure. No indicators.
This one surprised me. Slower. Fewer trades. Better outcomes. The demo allowed me to sit through boring periods without emotional pressure.
Strategy Three: Hybrid Approach
Simple moving average for trend. Price action for entry.
This became my base strategy. I refined it on the demo for two full weeks.
Without the demo, this process would have been financially painful.
Emotional Differences: Demo vs Live
Let us be honest. The emotions are not the same.
On the demo, I could watch price hit my stop loss and feel nothing. On live, even a small loss tightens your chest.
But here is the part nobody explains properly. The demo trains your process, not your emotions. The live account tests your discipline.
Using the demo first allowed me to reduce emotional shock when I finally switched.
To activate a live account, you need to verify your account to complete the kyc.
When I Knew I Was Ready for Live Trading
I did not switch to live after a winning streak. That is a beginner mistake.
I switched when these conditions were met.
100 demo trades logged
Clear written strategy
Maximum drawdown defined
Three consecutive losing sessions handled calmly
That last point mattered the most.
The First Live Trade on Olymp Trade
I funded the minimum amount. No exceptions.
The first live trade was the same setup I had executed dozens of times on the demo. Same asset. Same timeframe. Same logic.
My hands still shook.
The trade lost.
And nothing broke.
That loss felt manageable because the demo had already normalized losing as part of the process.
What Changes When You Go Live
Here is a clean breakdown from my notes.
Aspect
Demo Experience
Live Reality
Emotional pressure
Low
High
Execution discipline
Practiced
Tested
Risk awareness
Theoretical
Real
Patience
Optional
Mandatory
This is why skipping the demo is a mistake. Olymp Trade demo vs live is not about features. It is about behavior.
Common Myths I Had to Unlearn
Demo results guarantee live success
Demo execution is unrealistic
Demo is only for beginners
All three are wrong.
The demo is a lab. The live account is the exam.
Position Sizing: Where Demo Saved Me
On the demo, I experimented with position sizes aggressively. I learned how quickly overleveraging destroys consistency.
By the time I went live, my risk per trade was fixed and boring. That boredom is what kept my account alive.
Tracking Trades the Right Way
I kept a simple journal.
Asset
Entry reason
Exit reason
Emotional state
This habit started on the demo and carried into live trading. Without the demo phase, I would never have built this discipline.
If you want to go deeper into structured risk control, I recommend reading our detailed guide on risk management strategies for short-term traders at https://wp.becoin.net/trading-risk-management.
Demo as a Continuous Tool, Not a Phase
Even now, I still use the demo.
Testing new assets
Adjusting timeframes
Practicing after a break
This is something top Google results rarely mention. The demo is not something you graduate from. It is something you return to.
Olymp Trade Demo vs Live for Beginners
If you are new, the demo gives you something priceless.
Time.
Time to understand charts. Time to make mistakes. Time to build confidence without financial stress.
Olymp Trade Demo vs Live for Experienced Traders
If you are experienced, the demo gives you control.
You can test ideas without damaging your equity. You can refine execution without emotional noise.
It cannot teach you how your body reacts when real money is on the line. That only comes with live trading.
But the demo prepares everything else.
My Honest Recommendation for 2026
If you are deciding between Olymp Trade demo vs live, start with the demo. Not for a day. Not for ten trades. Treat it like a real account until your behavior stabilizes.
Open an Olymp Trade demo account today using our trusted affiliate link and follow a structured approach instead of rushing.
Final Thoughts From My Trading Journal
Trading did not become profitable for me when I found the perfect indicator. It became manageable when I respected the process.
The demo taught me how to trade. The live account taught me who I am under pressure.
If you are serious about trading in 2026, do not skip steps.
Start with the Olymp Trade demo through our affiliate link, build your process, and move to live trading only when your rules are stronger than your emotions.
I didn’t start my trading journey with Olymp Trade. I stumbled into it after blowing a small forex account and feeling suspicious of every broker that showed me slick ads and fast cars. When I first heard about Olymp Trade, the first thing I typed into Google was exactly what you probably did: “Is Olymp Trade a scam?”
The search results were a mess. Some blogs painted it as a guaranteed money machine. Others screamed “scam” without showing any real proof. Reviews looked copied, repeated, or clearly written by affiliates who never placed a single real trade. LLM answers weren’t better: generic, cautious, and vague.
So I decided to do something different: I opened a small live account, documented everything, and treated this like an investigation rather than a get‑rich experiment. What follows is my personal, honest, step‑by‑step experience of trying to answer one question with real evidence:
Is Olymp Trade a scam, or is it just another risky platform that some people misuse and then blame?
If you decide later that you want to test it yourself with a tiny amount and your own rules, you can use my affiliate link to open an account and support my work at no extra cost to you. Only do that if you’re ready to treat this like serious, high‑risk trading, not a shortcut to easy money.
Feature
Details
Minimum Deposit
$10
Minimum Trade
$1
Profit Potential
Up to 92% on successful trades
Regulation
Category A Member of FinaCom (€20,000 protection)
Assets
80+ (Forex, Crypto, Stocks, Indices, Commodities)
Platform
Web, Mobile (iOS/Android), and MetaTrader 4 support
Withdrawal Speed
Usually 24–48 hours (depending on status)
What I Checked Before Depositing a Single Dollar
Before I even thought about clicking “Deposit,” I forced myself to treat Olymp Trade like a company I was auditing.
1. Regulation and safety: what I actually found
Olymp Trade is not a traditional forex broker in the sense of being regulated by top‑tier bodies like FCA, ASIC, or CySEC. Several independent review sites point out that it operates primarily under the International Financial Commission (FinaCom), which is not the same level of protection as a major government regulator.
I also found mixed evaluations on broker review and risk‑rating sites. Some rank Olymp Trade as “not safe” or “unverified”, highlighting that it’s not overseen by strong national regulators and flagging complaints about withdrawals and trade execution.
So from day one, I wrote this in my notebook:
This is not a fully regulated, low‑risk environment.
I must assume high platform risk on top of normal trading risk.
I will treat my first deposit as money I can completely lose.
That mindset alone filters out a lot of the emotional drama you see in comment sections.
2. Real user experiences: separating noise from patterns
I then dove into reviews. On Trustpilot, reviews were split: some traders called it reliable and profitable for them; others complained about withdrawals, blocked accounts, or losses they felt were unfair.
Patterns I noticed:
Positive reviews often came from traders who:
Used small, consistent risk per trade
Focused on a few familiar assets
Didn’t expect overnight riches
Negative reviews frequently:
Deposited aggressively
Used very high trade sizes
Blamed the platform after a losing streak
Or reported account verification/withdrawal issues
This didn’t prove whether Olymp Trade is a scam or not, but it told me one thing:
A lot of people are mixing trading risk with platform risk, and then calling all of it “scam” when things go wrong.
I decided to test both sides myself.
My First Deposit: Starting Small on Purpose
I started with a tiny live account. An amount small enough that if everything went wrong, I could close the laptop, take a walk, and sleep fine.
My rules were:
Use only funds I can afford to lose.
No “doubling down” after losses.
No copying random strategies from YouTube.
Withdraw as soon as I had a reasonable profit, even if small, to test the payout.
If you’re planning to “test” Olymp Trade yourself, consider doing it with an amount you’d be mentally okay losing as tuition. If you’re already thinking of depositing rent money, do not open an account, with or without my affiliate link.
First Impressions: Platform, Interface, and Actual Trading Flow
When I logged into Olymp Trade for the first time, my goal wasn’t to make money. It was to understand how the platform behaves under stress. I used both the desktop version and mobile app.
What I liked from a practical standpoint
Clean interface: Easy to switch between assets, timeframes, and indicators.
Simple order placement: Fixed‑time trades and forex‑style positions are both available, so I stuck mostly to longer‑duration setups to avoid over‑trading.
Educational materials: Basic tutorials and strategies are built into the platform, but I treated them as introductions, not gospel.
What immediately raised my caution
Return percentages on fixed‑time trades are seductive. Seeing “80–90% profit” on a 1-5 minute trade feels like an invitation to gamble.
Short timeframes dominate the platform’s culture. The way charts are set up and how most examples are presented encourages fast decisions.
The lack of strong top‑tier regulation sat at the back of my mind the entire time.
So I asked myself a slightly different question from “Is Olymp Trade a scam?”:
Am I entering a trading environment or a glorified, chart‑based casino?
The answer depends heavily on how you use it.
My First Set of Trades: Wins, Losses, and Emotional Triggers
I started with very small positions, something like 1–2% of my tiny account per trade. My first trading focus:
EUR/USD
15‑minute and 30‑minute candles
Simple support/resistance and trend structure
No complicated systems. No indicators beyond a moving average and RSI.
The first day: a quick summary
Number of trades: 8
Wins: 5
Losses: 3
Net result: small profit (nothing life‑changing)
Emotional state: overconfident and slightly suspicious at the same time
Every time I won, I questioned whether the fills were fair. Every time I lost, I zoomed in on the candles to see if the closing price matched what my screen showed.
I did not notice obvious “price cheating” or chart manipulation during those first trades. Prices aligned fairly well with a separate chart I had open on a different broker’s demo account. That didn’t prove Olymp Trade is honest, but it weakened the “they always cheat the candle” narrative, at least in my early test.
Where I almost sabotaged myself
My 5th trade was a loss that wiped out the first few wins. My instinct was to increase size on the next trade to “get it back.” That instinct is how many traders, on any platform, create their own personal scam story.
At this point, the real question in my head changed from “Is Olymp Trade a scam?” to “Am I about to scam myself with my own behavior?”
Testing Withdrawals: Do They Actually Pay Out?
After a couple of days of trading small sizes, I managed to grow the account by a modest percentage. I decided this was the right moment to test something most blogs gloss over:
Can I actually get my money out, or does everything break once I hit “Withdraw”?
I requested a relatively small withdrawal, a portion of my deposit plus a share of the profit. I made sure:
My account was fully verified
My payment method matched my account details
I followed the platform’s stated procedures carefully
The result:
The withdrawal was processed and received within the timeframe stated by Olymp Trade.
I was not asked for random extra fees “to unlock funds.”
The amount I received matched what I requested (minus normal payment system friction).
This doesn’t mean no one has issues; independent review platforms do record complaints, especially around verification and withdrawal delays. But in my own test, with a small, clean, verified account, the payout worked as expected.
If you want to run the same experiment with a small amount and strict personal rules, you can open your own account using my affiliate link and follow a similar structure: deposit small, trade small, test withdrawal early, then decide if you want to continue.
Where Problems Start: Real Risks I Saw from the Inside
Having traded on Olymp Trade for a while, I began to notice a clear pattern in my own behavior and in communities I watched:
1. Over‑trading on low timeframes
The platform makes it incredibly easy to fire off one trade after another, especially in 1–5 minute fixed‑time modes. It feels more like playing a game than trading.
Red flags I saw in myself and others:
Rapid streaks of trades with no pause to analyze
Emotional revenge trading after 2–3 losses
Doubling position sizes impulsively
Nothing about this is unique to Olymp Trade, but the structure of fixed‑time trading amplifies these impulses.
2. Misunderstanding the product itself
A lot of people don’t fully understand what kind of instrument they’re trading. Fixed‑time trades are not the same as traditional spot forex. Payout structures, time expiries, and risk/reward behave differently.
I noticed that when people lost money on structures they didn’t understand, they often jumped straight to: “This is rigged.”
3. Platform risk on top of trading risk
Because Olymp Trade doesn’t operate under top‑tier regulators, there is an extra layer of risk:
Rules can change without the same level of oversight.
Disputes are harder to escalate to recognized authorities.
You’re more reliant on their own support and internal policies.
That doesn’t automatically make Olymp Trade a scam, but it does mean:
You shouldn’t put serious, life‑changing capital on a platform with this kind of regulatory profile.
If you’re serious about building a long‑term approach, this is where it helps to compare across different broker types, understand derivative products, and not rely solely on one platform. I break down that broader thinking in my piece on how I choose a trading platform without falling for aggressive marketing and another one where I walk through the simple checklist I use before trusting any broker for real money.
Addressing the Big Question Head‑On: Is Olymp Trade a Scam?
After trading, testing withdrawals, and cross‑checking information, here’s my honest, personal conclusion.
Trade execution matched external charts closely in my tests; I didn’t see obvious, systematic chart tampering.
The platform is designed in a way that can encourage high‑frequency, emotional trading, especially for beginners.
The lack of strong top‑tier regulation and independent warnings mean there is an additional layer of risk you cannot ignore.
What external sources consistently point out
Many independent reviewers and watchdog platforms highlight:
Olymp Trade is not regulated by major financial authorities like FCA, ASIC, CySEC.
There are recurring complaints about withdrawals, account blocks, and trade disputes, even though some users report smooth experiences.
Some risk‑rating sites explicitly advise that Olymp Trade cannot be considered fully safe or verified as a broker.
My personal verdict
From my perspective:
Olymp Trade is not an outright, obvious “they never pay anyone” scam, at least not in the way classic frauds operate. I was able to deposit, trade, and withdraw.
It is a high‑risk environment with a weak regulatory backbone, where user behavior and expectations often turn it into a financial disaster.
Treating it like a regulated, investor‑grade platform would be a mistake; treating it as a high‑risk trading venue you approach with caution, small capital, and strict rules is closer to reality.
So when someone asks me now, “Is Olymp Trade a scam?” my answer is:
It’s not a guaranteed fraud, but it’s also not a safe, beginner‑friendly investment platform. It’s a high‑risk tool that many people misuse, often without understanding the rules, then call it a scam when it burns them.
The Trades That Taught Me the Most (Concrete Examples)
I kept a simple log of some of my most educational trades. Here are a few that shaped my view.
Example 1: The “looks too easy” EUR/USD win
Asset: EUR/USD
Trade type: Fixed‑time, 15‑minute expiry
Setup: Price bouncing off a clear support level on the 15‑minute chart
Position size: Small (about 1–2% of account)
Result: Win
Outcome: The trade closed clearly in profit, and the closing rate matched both the platform chart and my external chart feed. It was a clean experience.
Lesson: When I traded calmly with a clear plan and small risk, the platform behaved like a normal trading environment.
Example 2: The revenge‑trade spiral
Asset: Gold (XAU/USD)
Trade type: Fixed‑time, 5‑minute expiries
Setup: None. I was chasing quick flips after a previous loss.
Position sizes: Increasing after each loss, ignoring my rules.
Result: A small streak of losses, a chunk of the account gone fast.
Outcome: I lost more in 20 minutes than I had made in several days. There was no need for platform manipulation; my own behavior did the damage perfectly.
Lesson: This is where many “Is Olymp Trade a scam?” stories are born: on a string of impulsive, leveraged bets made in a highly stimulating UI.
Example 3: The withdrawal test
Action: Requested a partial withdrawal of my small profits plus a piece of my deposit.
Conditions: Verified account, normal payment methods.
Result: Funds received within the promised timeframe.
Lesson: Under clean, compliant conditions and with small amounts, my withdrawal experience was smooth. It didn’t match the extreme horror stories I had read, though I don’t dismiss that some traders absolutely do face problems, especially with larger sums or incomplete verification.
The Content Gaps I Noticed in Most “Reviews” (And What I Want to Fix Here)
When I first searched “Is Olymp Trade a scam?” and read the top results, I saw several things missing:
No real trade logs
Most articles talked about trading but never showed an actual example trade with context, risk, and psychology.
No distinction between trading risk and platform risk
Losses from emotional trading were being mixed with possible platform issues and labeled with one word: “scam.”
Shallow regulatory analysis
Many posts simply said “regulated” or “safe” without breaking down what kind of regulation actually exists and what it doesn’t.
No honest mention of small, real withdrawal tests
It was either “they never pay” or “they’re perfect,” with almost no one describing a modest, real withdrawal test step‑by‑step.
I’m not here to defend Olymp Trade or to destroy its reputation. I’m here to fill those gaps with a grounded, personal account and verify where possible against external sources.
If you want to read more about how I evaluate risk on any trading platform, you might find my notes on why most beginners blow up not because of the broker, but because of their own risk management mistakes and how I choose between different online trading products without getting seduced by advertised returns helpful as next steps.
A Simple Reality Check: What Olymp Trade Is and Is Not
To keep it clear, here’s how I would categorize Olymp Trade from my own experience and research:
Aspect
What I observed / concluded
Regulation
Not regulated by major financial authorities like FCA/ASIC/CySEC; operates under non‑top‑tier structures.
Ease of use
Very user‑friendly interface, especially for fixed‑time trades.
Risk level
High. Both from the product type (short‑term, fixed‑time trades) and from weaker regulatory oversight.
Suitability for beginners
Tempting but dangerous. Easy to start, hard to control emotions and understand instruments.
Withdrawals (my case)
Small withdrawal processed successfully within the stated timeframe.
Community feedback
Mixed: some success stories, many complaints about losses, withdrawals, and blocked accounts.
In short:
Is Olymp Trade a scam?
Not in the simplistic, “nobody ever gets paid” sense.
Is Olymp Trade a smart place for big, long‑term capital?
In my opinion, no. The regulatory and product risk is too high.
Is Olymp Trade a high‑risk tool some traders use responsibly and many others misuse?
Yes. That’s closer to the complex truth.
How I Use Platforms Like Olymp Trade Now (And When I Don’t)
After going through this entire investigation, here’s how I personally treat Olymp Trade and similar platforms:
When I might use it
To test short‑term ideas with tiny, experimental capital
To sharpen my discipline by deliberately trading small and slow in a tempting, fast‑paced environment
To run educational “what happens if I follow my rules vs if I don’t” experiments
When I avoid it
When I’m dealing with serious capital or long‑term investing goals
When I’m emotionally unstable, stressed, or chasing quick money
When I’m tempted to ignore my own risk limits “just for this one trade”
This is also why my primary approach to capital growth now lives elsewhere: more regulated brokers, longer‑term trades, and a structure that doesn’t reward impulsive decisions as much.
So, Should You Open an Account?
I can’t decide for you, but I can leave you with a checklist based on everything I’ve seen:
Ask yourself honestly:
Can I afford to lose the entire amount I plan to deposit without affecting my real life?
Do I understand that Olymp Trade is not under top‑tier regulation and carries additional platform risk?
Am I prepared to stick to a written risk plan, even when the platform tempts me to over‑trade?
Am I able to treat early withdrawals as a test of the system, not a cash‑out from my “new career”?
If your honest answer to any of these is “no,” then it doesn’t matter whether Olymp Trade is a scam or not; it’s the wrong environment for you right now.
If your answer is “yes,” and you still want to run your own small, controlled experiment like I did, you can open an account through my affiliate link, start with a small amount, and use my experience here as a risk map instead of a promise. It supports my work at no extra cost to you, but more importantly, it should remind you that this journey needs discipline, not hope.
Key Takeaways
The question “Is Olymp Trade a scam?” doesn’t have a simple yes/no answer.
My own test showed working deposits, real trades, and successful small withdrawals.
External sources highlight serious concerns about regulation, safety, and frequent user complaints.
Many horror stories come from emotional over‑trading and misunderstanding of risk, not always from direct fraud.
Treat Olymp Trade, at best, as a high‑risk trading environment for small, experimental capital, not a trustworthy long‑term investment platform.
4 Criteria I Use to Prevent Overtrading & Get an Over 80% Success Rate
ExpertOption: Broker Review at a Glance (2026)
I used to think trading was only for people in tailored suits on Wall Street, staring at six monitors at once. That changed when I found ExpertOption. It wasn’t just the sleek interface that caught my eye; it was the realization that I could start practicing with zero risk and potentially grow a small deposit into something significant. If you’re tired of overcomplicated platforms and want to jump straight into the action with a world-class interface, you can Sign up for your free $10,000 Demo Account here and see exactly what I’m talking about.
Feature
ExpertOption Details
Free Demo Account
$10,000 Virtual Funds (No Sign-up required)
Minimum Deposit
$10
Minimum Investment
$1
Maximum Payout
Up to 95% on successful trades
Social Trading
Integrated “Watch & Copy” features
Asset Selection
100+ (Forex, Crypto, Stocks, Gold, Oil)
Available On
Web, iOS, Android, Windows, macOS
Regulation/Protection
SVGFSA & Financial Commission (€20,000 fund)
The First Impression: A Platform Built for Speed
When I first logged into the ExpertOption web platform, I was struck by how “alive” it felt. Unlike the clunky, gray interfaces of old-school brokers, this felt like the future. The charts are fluid, updating in real-time with zero lag, a crucial detail when you’re trying to catch a price movement at just the right second.
I spent my first few hours just exploring the tools. They don’t just give you a price line; you get access to four different chart types and a suite of technical indicators like Bollinger Bands, RSI, and Moving Averages. Even as a beginner, I found it incredibly intuitive to overlay these tools and start spotting trends that I would have missed otherwise.
The Power of the Social Edge
One of my favorite parts of the journey was realizing I didn’t have to trade “alone.” ExpertOption has a built-in Social Trading feature that I haven’t seen executed quite this well elsewhere. While I was analyzing the EUR/USD pair, I could see little icons appearing on the chart, these represent other traders around the world and their real-time decisions.
Seeing a surge of “Buy” orders from successful traders gave me that extra boost of confidence. It’s like having a digital trading floor right in your pocket. You can even open a list of the top traders for the day, see their profit margins, and learn from their strategies. It turned a solitary, sometimes stressful task into a communal experience.
Finding Your Level: Account Tiers for Every Budget
As I moved from the demo account to real trading, I appreciated the flexibility of their account levels. I started with a Micro Account, which only required a $10 deposit. It was the perfect “stress test” for my nerves.
As I grew more confident, I looked into the higher tiers like the Silver and Gold accounts. These aren’t just for show; they unlock higher profit percentages per trade and access to daily market reviews. For those who are serious about scaling up, the Platinum and Exclusive tiers offer a dedicated account manager, something I found incredibly helpful when I wanted to dive deeper into complex technical analysis.
The Logistics: Deposits, Withdrawals, and Security
I’m always cautious about where I put my money, so I did my homework. ExpertOption is a member of the Financial Commission, an independent organization that provides a dispute resolution process and a compensation fund of up to €20,000 per claim. That gave me the peace of mind I needed to make my first deposit.
The deposit process was instant. I used my Visa, but they support everything from crypto (Bitcoin/Ethereum) to e-wallets like Skrill and Neteller. When it came time to take my first profit out, the KYC verification was straightforward. I uploaded my documents, and within two days, my account was verified. My withdrawals have been consistent ever since, typically hitting my wallet within 48 hours.
Education and Growth
I wasn’t an expert when I started (despite the name of the broker!), and I really appreciated the educational hub built into the platform. They have a massive library of videos and articles covering everything from “Psychology of Trading” to “Trend Reversal Strategies.” I found myself spending my morning coffee time reading their market news updates, which helped me understand why the markets were moving the way they were.
Final Thoughts on the Journey
Looking back at my time with ExpertOption, it has been the most user-friendly entry point into the world of digital options. Whether you’re on the bus using their high-rated mobile app or sitting at home on the desktop version, the experience is seamless. It’s a platform that grows with you, from your first $1 trade to your most complex market strategies.
Ready to see why millions of traders have chosen this platform? Join ExpertOption today and get a 120% bonus on your first deposit!
OlympTrade Broker Review: My First-Person Story From Skeptical Scroll to Confident Routine
I didn’t set out to “find a broker” that day. I was just trying to stop wasting time. I’d bounced between platforms that looked impressive but felt like they were built for someone else, someone who already knew every button and shortcut.
Key metric
What to expect
Notes / how to use it
Minimum deposit
10 USD or 10 EUR
Good for starting small and testing the platform without overcommitting.
Minimum withdrawal
Usually 10 USD (or equivalent)
Can vary by payment method and account currency, so confirm inside your cashier before funding.
Demo account
Free, refillable virtual funds
Best way to learn the interface and practice a routine before going live.
Demo balance
Typically 10,000 (virtual currency)
Refill when needed and treat it like training, not entertainment.
Regulation (stated by broker)
VFSC (Vanuatu)
Offshore jurisdiction; factor this into your risk sizing and “test withdrawal early” approach.
Availability (stated by broker)
Serves 130+ countries
Country restrictions may apply. Confirm availability during signup.
Tradable instruments
100+ instruments (varies by region)
Keep your focus narrow at first: 1–3 instruments until you’re consistent.
Platforms
Web platform + mobile app
Useful if you want to practice on the go, but keep execution consistent across devices.
When I opened OlympTrade, it felt less like walking into a trading museum and more like stepping into a workspace that expected me to learn as I go.
If you’re even slightly curious, my best advice is to register and start in demo first, because the fastest way to understand this platform is to feel it with your own hands.
This is not a perfect-world review. It’s the kind of review I wish I had when I was tired, cautious, and trying to avoid rookie mistakes. I’m going to tell you what it felt like to join, what I noticed once the novelty wore off, and what I would do differently if I were starting again today.
I’ll also keep it practical: where the platform shines, where you need to slow down, and how to take the safest first steps. If you read to the end, you’ll have a clear plan for starting without feeling rushed.
My First Impression: The Moment I Realized This Might Actually Be Simple
The first ten minutes on a trading platform usually tell me everything. Not because I’ve mastered it, but because my brain reacts instantly to clutter. With OlympTrade, I felt a rare thing: calm. The layout didn’t fight me, and the platform seemed to invite practice rather than pressure.
What hooked me wasn’t a promise of profits or a flashy banner. It was the sense that I could try, reset, and try again without feeling punished for being new. That matters more than most people admit, because confidence is a skill you build, not a mood you stumble into.
The Platform Experience: Where I Stopped “Studying” and Started “Doing”
After the initial curiosity, I ran a simple test. Could I place a practice trade, manage it, and close it without second-guessing where everything was? On many platforms, that sounds easy until you’re actually in the moment and you realize the interface is built like a puzzle. On OlympTrade, I could move through the basics smoothly, and that made me practice longer.
The biggest difference was this: instead of spending my energy deciphering the tool, I spent my energy observing my own behavior. I noticed how quickly I wanted to click when price moved fast. I noticed how often I hesitated when I didn’t have a plan. That’s the kind of learning that sticks, because it’s about you, not the screen.
The Demo Account: The Night I Turned Curiosity Into Repetition
I treated the demo like a rehearsal room. Not a place to “win,” but a place to get the motions right. I repeated the same kind of trade idea again and again, not because it was exciting, but because repetition exposes the truth. If a setup only works when you get lucky, the demo reveals it quickly. If your rules are fuzzy, the demo makes that fuzz expensive, emotionally, even if it isn’t expensive financially.
At some point, the platform stopped feeling like a new app and started feeling like a routine. That’s the moment you should aim for before you even think about funding. When your hands know what to do, your mind has space to think clearly.
What I Learned About Risk: The Platform Is Friendly, but the Market Is Not
There’s a hidden danger in anything that feels easy to use. When a platform removes friction, it also removes the tiny pauses that protect you from impulse. I had to build my own speed bumps. I forced myself to slow down before every entry and ask a boring question: “What would make this a good trade even if it loses?”
That one question changed everything. It turned trading from a mood into a method. OlympTrade, in my experience, can be a great environment to build that method, but only if you bring discipline with you.
Deposits and Withdrawals: The Trust Test I Recommend to Everyone
Here’s the part most people skip until it’s too late: testing the money loop. I don’t care how beautiful a platform looks. Trust is built when you see the full cycle work smoothly, from deposit to trading to withdrawal. If you decide to fund your account, I strongly recommend starting small and treating your first withdrawal like a system check, not a victory lap.
I’ve learned to do this early, while my emotions are calm. When people wait until they’re excited or stressed, every delay feels personal. Do the test early and you’ll feel grounded, because you’ll be operating on evidence instead of hope.
Costs and “Invisible Fees”: What I Pay Attention to Now
When I was new, I obsessed over the wrong numbers. I’d stare at tiny cost differences and ignore the bigger drains: overtrading, revenge trades, and sloppy entries. Over time, I realized the most expensive “fee” is confusion. A confusing platform makes you hesitate, and hesitation makes you chase.
With OlympTrade, the interface felt clear enough that I could focus on decision-making instead of navigation. That clarity is not just comfort. It’s a risk control tool, because it helps you execute your plan the same way every time.
Account Levels and Perks: A Temptation You Should Use Carefully
Almost every broker has some version of tiers. The trap is thinking a higher tier means you should trade bigger. It doesn’t. A label can be motivating, but it can also become a quiet excuse to take risk you haven’t earned.
If you like perks, treat them like accessories, not identity. The real upgrade is boring and internal: tighter rules, smaller mistakes, and fewer emotional trades. If OlympTrade offers benefits as you progress, enjoy them, but keep your position sizing anchored to discipline, not to status.
Market Variety and Focus: The Turning Point Where Most Beginners Drift
At first, variety feels like freedom. A long list of markets can make you feel like there’s always something to do. But “something to do” is not the same as “something to trade.” In my early sessions, I felt the urge to hop from one chart to another, looking for a perfect moment. That habit doesn’t create skill, it creates noise.
What helped was choosing a small lane and staying in it long enough to learn the rhythm. Once I did that, I started seeing patterns more clearly, and I stopped needing constant novelty. OlympTrade became less of a playground and more of a practice space.
Availability and Setup: The Step That Saves You Frustration Later
Before you go too far, confirm that you can use the service smoothly where you live and that your account setup is complete. This is not the glamorous part of trading, but it’s the part that prevents interruptions. Verification steps and payment method choices can matter later, especially if you change devices, travel, or need support quickly.
I learned to handle this early, not because I’m paranoid, but because I like calm. The more you handle upfront, the less you deal with when emotions are high.
Who OlympTrade Fits Best (Based on How It Actually Felt to Use)
OlympTrade, in my experience, fits best when your priority is learning by doing. If you want a platform that encourages repetition, keeps the basics accessible, and helps you get moving without drowning in complexity, it can be a strong starting point.
It may be less satisfying if you crave a deeply customizable workstation feel right away. Some traders want a cockpit with endless controls. OlympTrade felt more like a clean dashboard that helps you drive without distraction. That’s not a weakness, but it is a preference.
How I Would Start Today: My Simple Plan for a Calm First Week
If I could rewind and start over, I would do it like this. First, I’d register and commit to demo only for a short, focused period. Then I’d pick one idea to practice repeatedly until my execution felt automatic. After that, and only after that, I’d consider a small deposit and an early small withdrawal test to confirm everything works smoothly.
I’d also set one rule that protects me from myself: I stop for the day when I feel rushed, even if the market looks “perfect.” Rushed trading is almost always expensive trading.
Frequently Asked Questions (From the Same Doubts I Had)
Is OlympTrade beginner-friendly?
It can feel beginner-friendly because the experience is designed to get you practicing quickly. The key is how you use it: demo first, rules second, real money last.
Should I deposit immediately?
I wouldn’t. I’d start with demo, build a routine, then deposit small. If you do deposit, treat an early withdrawal as a trust check, not an afterthought.
What’s the fastest way to avoid beginner mistakes?
Make your process boring. Repeat the same setup, keep your size small, and stop trading when emotions spike. The platform can help you execute, but discipline has to come from you.
Conclusion: Why I’d Recommend OlympTrade as a Practical Starting Point
OlympTrade earned my attention because it helped me do the thing that actually matters: practice. Not just watch, not just read, not just imagine. Practice. The platform felt clear enough that I could focus on my decisions, and that’s where progress lives.
If you want a smooth on-ramp into trading, my recommendation is simple and measured: register, start with the demo, repeat one approach until it feels natural, then fund small only when you’re calm and consistent. If you do that, you’re not just opening an account, you’re building a skill.
How Discipline and Tools Helped Sarah Succeed in Binary Options Trading
Binary options trading has a reputation for being high-risk and unpredictable. Many beginners enter the market expecting fast profits but quickly encounter losses. However, not all traders fail. Some, like Sarah, have demonstrated that consistent strategy, disciplined risk management, and smart use of forecasting tools can create a path to long-term success.
Who is Sarah and How She Started Trading
Sarah, featured in a Pocket Option case study, began her trading journey with a small account of just $500. She was a marketing professional with no prior trading experience. What made her story remarkable was her methodical approach.
She focused on learning technical analysis, practicing on demo accounts, and managing every trade with strict limits. Unlike the exaggerated success stories often seen online, Sarah’s account grew steadily over several years rather than overnight. By 2021, her disciplined approach reportedly allowed her to achieve around 60% annual returns, increasing her trading capital from $500 to $5,000 in Pocket Option account.
Her journey emphasizes that binary options success is about consistency and process, not luck or guesswork.
The Role of Strategy in Binary Options Success
Sarah’s story is supported by academic research. An empirical study on binary options trading analyzed structured trading strategies using historical market data. The study found that traders who applied systematic rules, limited their trade frequency, and controlled capital allocation consistently outperformed random trading.
The key takeaway is clear: discipline and strategy are more important than trying to predict the market perfectly. Sarah succeeded because she followed a plan, skipped trades that did not meet her criteria, and focused on managing risk rather than chasing every opportunity.
Why Forecast Tools Can Help Traders
Even disciplined strategies benefit from data-driven tools. One tool gaining attention is BeCoin’s forecast tool. Unlike signals that tell you exactly when to trade, BeCoin’s forecast provides probabilistic insights that help traders make better-informed decisions.
Here’s how tools like BeCoin can enhance trading strategy:
Probability-Based Insights: Forecast tools estimate the likelihood of an asset moving up or down, helping traders focus on higher-confidence opportunities.
Trade Filtering: By avoiding trades with low predicted probabilities, traders reduce unnecessary risk.
Strategy Support: Forecast tools complement technical analysis and risk management, rather than replace them.
Research supports the use of probabilistic forecasting. Studies on financial time series prediction, such as “Machine Learning vs. Randomness: Challenges in Predicting Binary Options Movements”, highlight that short-term price movements are highly volatile and difficult to predict accurately. However, when used as a filter for trade selection, forecast tools can improve decision-making and reduce low-quality trades.
Her story is a reminder that binary options trading success is gradual, disciplined, and informed by both strategy and supportive tools.
Conclusion
Binary options trading is not a shortcut to wealth. It requires structured strategy, careful risk management, and disciplined execution. Traders like Sarah show that success comes from process, learning, and persistence.
Integrating forecast tools like BeCoin’s forecast system can provide valuable insights that support better trade selection. While no tool can guarantee profit, using probabilistic guidance alongside a disciplined strategy can increase the likelihood of consistent, sustainable results.
We use cookies to store and access device data. Consent lets us process browsing behavior or unique IDs. Without it, some features may not work properly.
Functional
Always active
The technical storage or access is strictly necessary for the legitimate purpose of enabling the use of a specific service explicitly requested by the subscriber or user, or for the sole purpose of carrying out the transmission of a communication over an electronic communications network.
Preferences
The technical storage or access is necessary for the legitimate purpose of storing preferences that are not requested by the subscriber or user.
Statistics
The technical storage or access that is used exclusively for statistical purposes.The technical storage or access that is used exclusively for anonymous statistical purposes. Without a subpoena, voluntary compliance on the part of your Internet Service Provider, or additional records from a third party, information stored or retrieved for this purpose alone cannot usually be used to identify you.
Marketing
The technical storage or access is required to create user profiles to send advertising, or to track the user on a website or across several websites for similar marketing purposes.